Build an IoT Hub using FreeBSD Part 1
As part of my experimentation with IoT devices, especially developing on and running AtomVM on the Espressif ESP32 platform, I have been wanting to put together a machine that would serve as an 802.11 wireless AP, as well as an aggregation point for data collected by IoT devices, providing visibility into the data they collect. It could even eventually serve as a kind of “command and control” center for devices, but that work will need to come later. For lack of a better term, I call this machine the iothub.
This blog post is Part 1 of a two-part series. In this post, I will walk through the steps I used to build an iothub device using FreeBSD as a base operating system. In the second part, I will discuss the software stack used to collect and aggregate data, as well as a few of the IoT devices and device software used to collect sensor data.
Requirements
The device should be small, affordable, and require minimal configuration. (It’s okay for a lot of configuration to be done via the command line, for now. But eventually it would be nice to write a GUI for it.) Since it will be run 24/7, it should consume as little power as possible.
It should attach to an existing network, such as a home modem or router, via and ethernet cable. It should support being a DHCP client, since most home routers are also DHCP and DNS servers, but it should also be capable of being assigned a static IP address (unlikely).
The machine should be capable of operating “headless” once set up and configured. All administrative operations should be able to be performed over SSH using an administrative account. (That is not to say you won’t need a keyboard and monitor to get started – you will at least need them for installation of the OS, and potentially for administrative mistakes that accidentally lock you out of the machine.)
It should provide a wireless AP for IoT devices, and the network associated with this AP should be isolated from the user’s home network, to which the iothub is attached. No traffic (unless specified otherwise) should make it from an IoT device out of the iothub device. Conversely, (with perhaps some exceptions), devices in the home network should not have access to the iothub AP network. The SSID for the AP network may not, and likely should not, be broadcast.
The device should provide an interface into any data collected by the IoT devices via the network to which the device is connected. For example, a user connected to the “home” network should have access to the data collected and aggregated from the IoT devices connected to the device’s AP network.
The relationship of the iothub machine and the home network and IoT devices is illustrated in Figure 1.
+-----------+                     +-----------+
|           |                     |           |
|         +---+                 +---+       +---+                     +--+
|         |   o-----------------o   |       |   | )))    802.11   ((( |  |
|         +---+     ethernet    +---+       +---+                     +--+
|           |                     |           | AP                     IoT
+-----------+                     +-----------+                       device
 modem/router                     iothub

                                                Figure 1.  iothub network
Because this is a DIY project, it must be built as cheaply as possible, with gently used or otherwise discarded parts, sourced on eBay, scrounged from friends, or otherwise scavenged from discarded bits in electronics boneyards. Where would the sport be, in buying something new and shiny off the shelf?
And of course like any DIY project, it should be built using open source software and tools.
The Hardware
I found a Lenovo Think Center M72e mini-PC on eBay for around $80, with shipping. That was a bit more than I had hoped to spend, but the machine came with an Intel Core-i5 processor (4 core), 8GB of RAM, a 128GB SSD drive, Wifi card and antenna, and external power supply. It draws around 17 watts idle, which at local electricity prices works out to around $20/year.
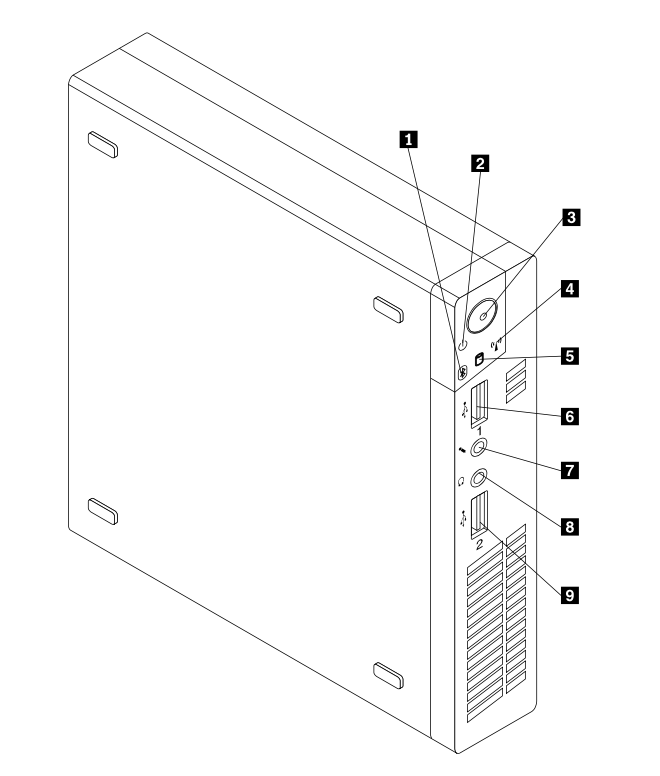
It turned out that the WiFi adapter that came with this machine was an Intel Centrino adapter that probably would work fine with Linux, but the FreeBSD iwn(4) driver does not support AP mode for this device type.
I was able to source an Atheros AR5B95 b/g/n PCIe adapter on eBay for around $9, since the FreeBSD ath(4) driver has HOSTAP in its capabilities. After delivery, it was just a matter of popping the cover, removing the hard drive, and taking out the two screws that secured the Centrino board. Assembly is the reverse of removal.
I had a spare Dell monitor (using a VGA monitor cable) and USB keyboard scavenged from the local dump.
Given this choice, it would be interesting to know what other options there are out there at a relatively affordable cost. A Raspberry Pi might be an option, but the wireless AP capabilities are uncertain (USB dongle?), and the storage capabilities may also be limited. There are numerous cheap mini-PCs on the market today, but I can’t vouch for their compatibility with FreeBSD or the availability of drivers for peripheral devices. I know I just found something that worked, so before spending any hard-earned cash, do your research first. Bear in mind that older hardware has a better chance of being supported.
The FreeBSD Operating System
We’ll be using FreeBSD for the base operating system. FreeBSD is a mature, robust operating system on which large swaths of the internet are built. FreeBSD is easy to install and easy to use. It comes with outstanding documentation and a community of dedicated users.
I chose FreeBSD because I wanted to use this as a learning experience about operating systems, networking, and what it takes to build a device of this nature. I find the FreeBSD documentation exceptional; while I do sometimes resort to search engines to find answers to problems, I usually just have to go back to the FreeBSD Handbook and man pages, and I can usually find the answer, with enough patience and careful reading, to my problems.
Installation
I won’t go over the details about how to install FreeBSD on this machine (instructions can be found here). Basically what I did was simple:
- Burn a USB stick with the 13.1-RELEASE memstick (using Balena Etcher, but
ddalso works); - Boot the machine with the USB stick installed;
- Press F12 to boot into the BIOS, and ensure that the machine will boot from USB;
- Boot and follow the installation instructions, using values appropriate to your environment.
For specific answers to questions in the installer:
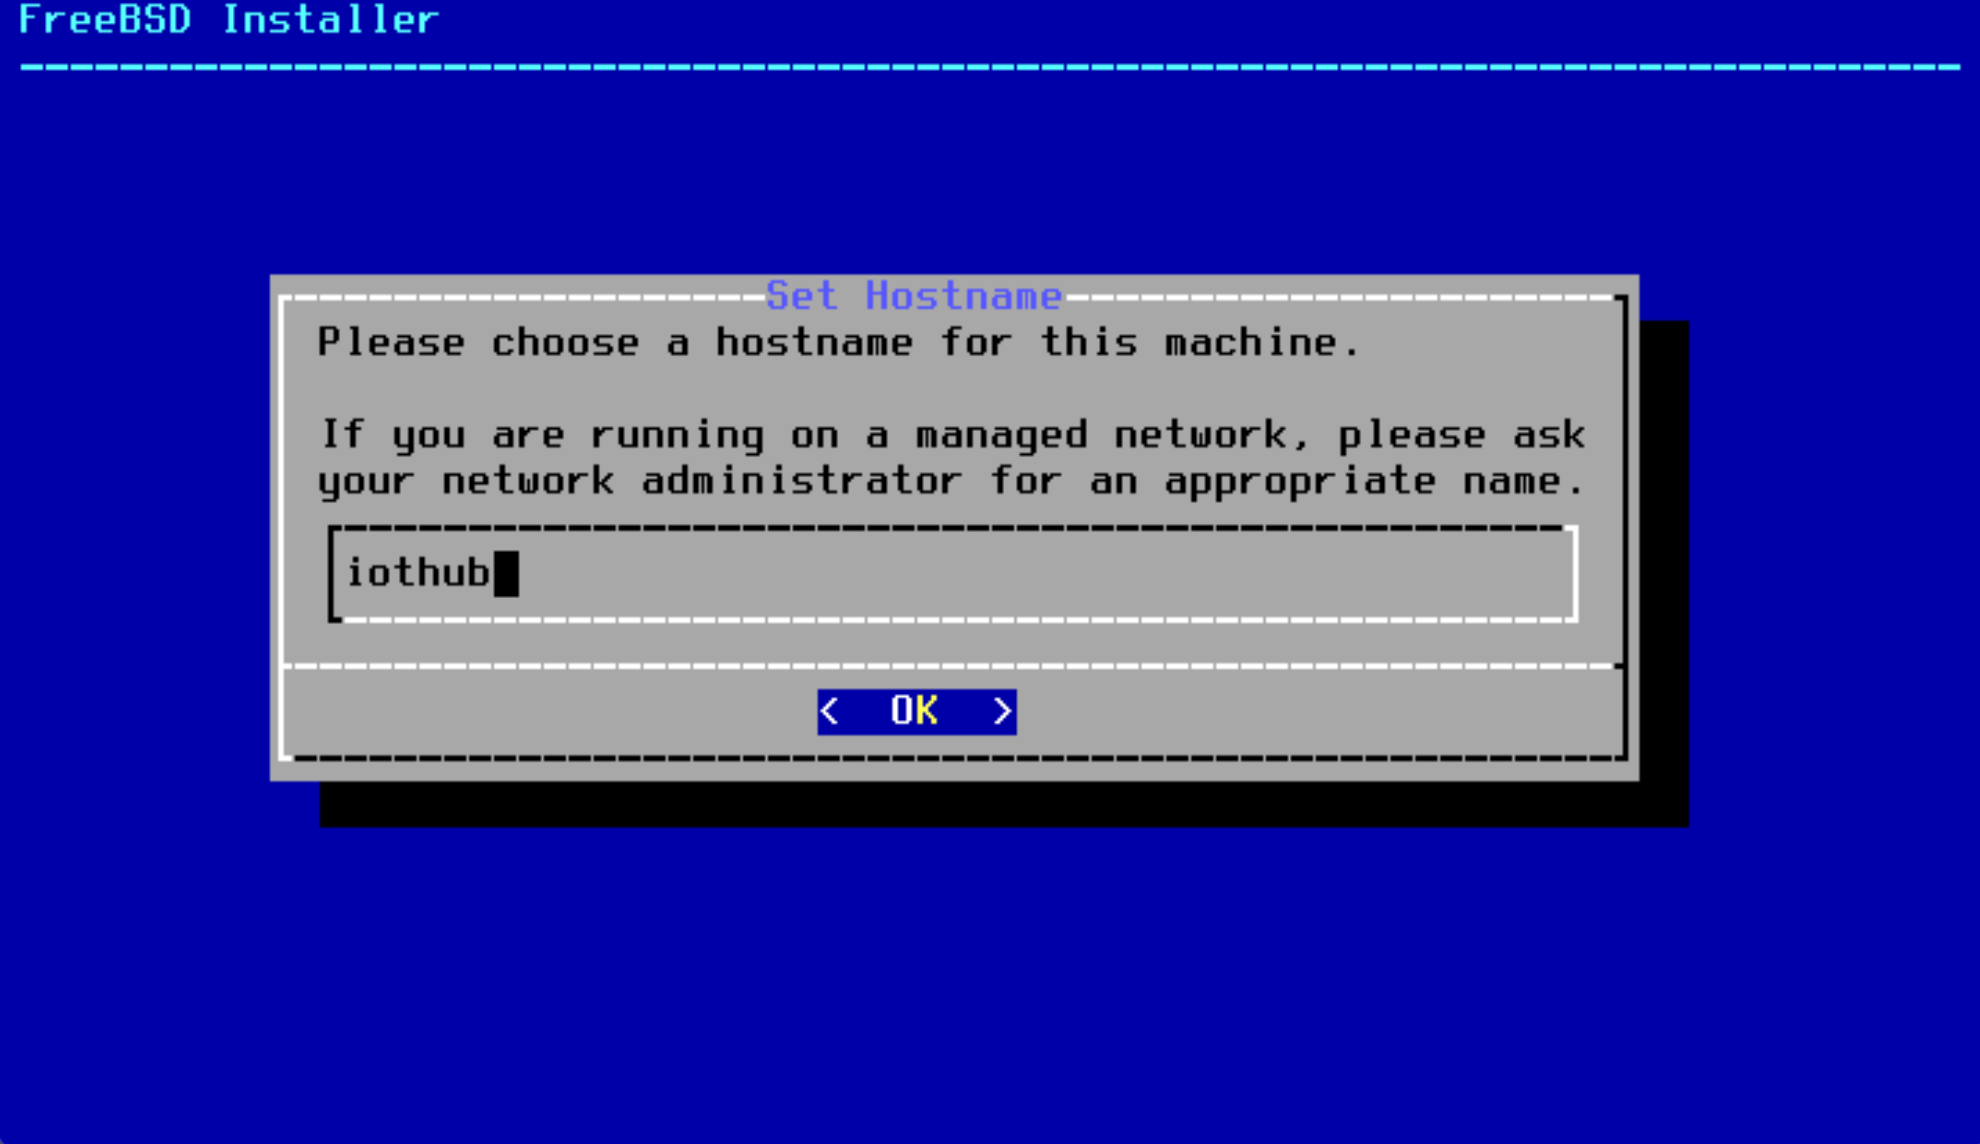
- Set the host name to
iothub:
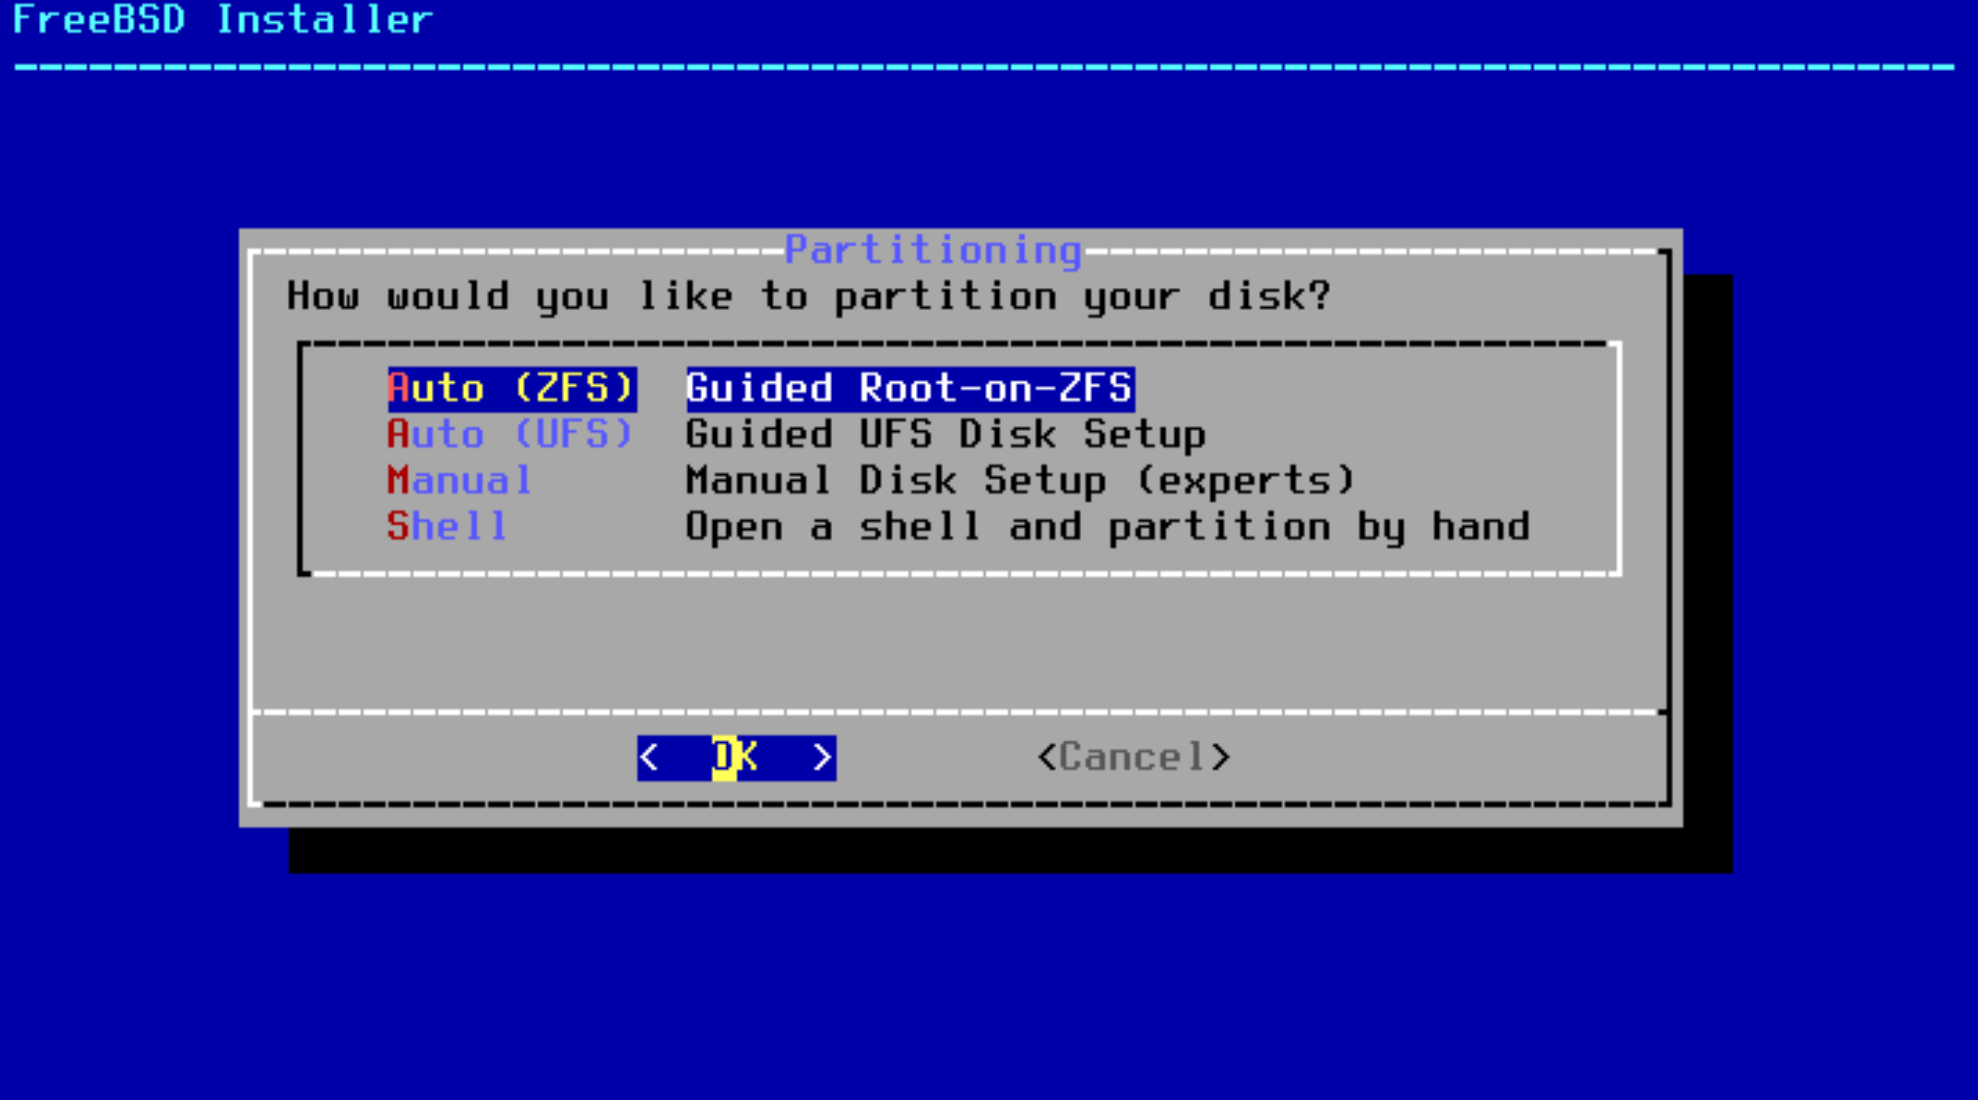
- Select
Auto (ZFS)in the disk partition panel:
- For the partition scheme, you may need to muck around with various settings to get the BIOS to recognize the boot partition:
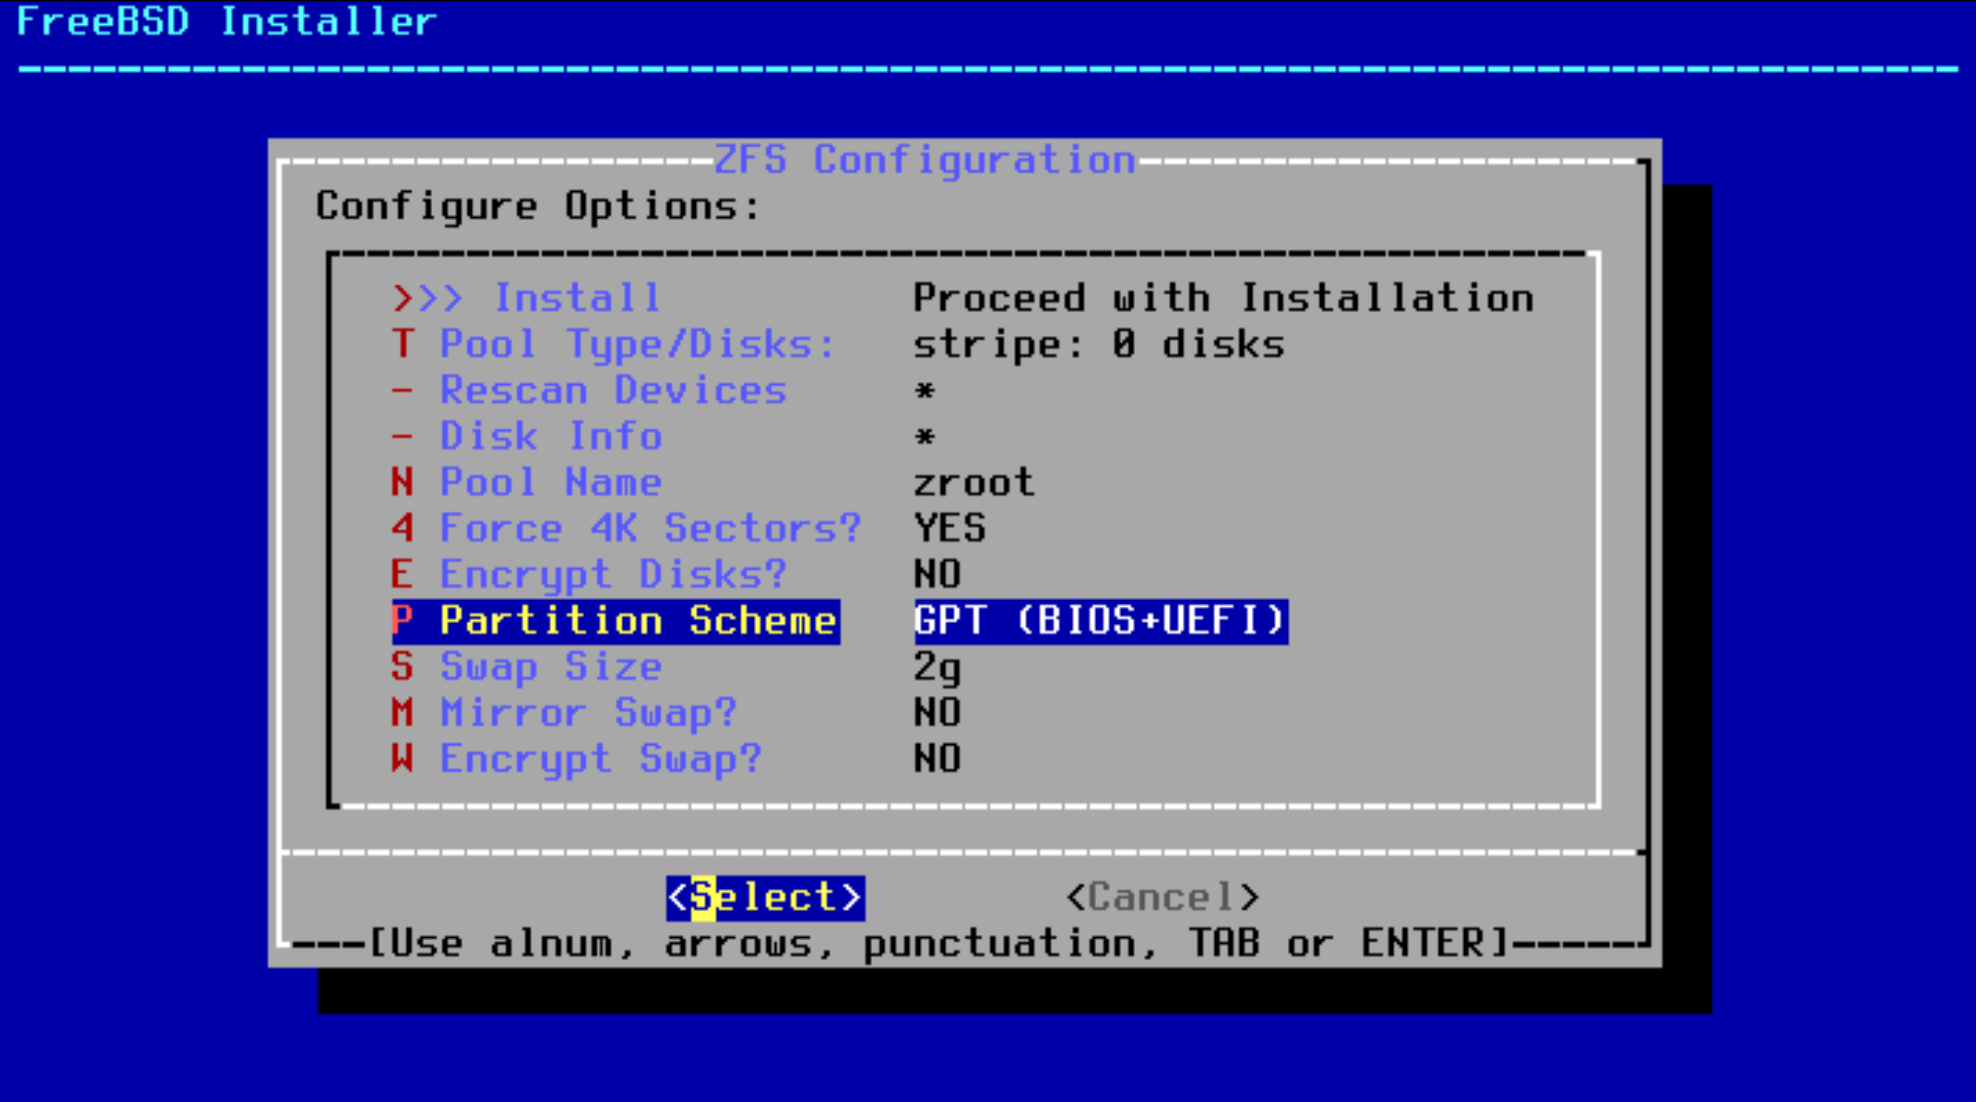
I had to select the specific Lenovo fix. Go figure.
- You will want to select no redundancy for ZFS, unless your machine has multiple disks.
- You will be asked to create a password for the
rootuser. Choose something safe. - When configuring networking, we assume you have a DHCP server to which the machine is connected via and ethernet cable. Supply a statically assigned IP address, otherwise.
- Create an Administrative user (
admin), when you are given the option to create an additional user. You will find this useful when it comes to performing administrative operations (see below),
Post-installation
We will perform one post-installation task, which will make it possible to log into the machine via ssh with administrative privileges. You will find this is a lot easier than trying to work on the console.
After reboot, log into the console as the root user and use the pkg tool to install the sudo command:
root@iothub:~ # pkg install sudo
...
Use the visudo command to edit the sudoers file (On the BSDs, /usr/local/etc/sudoers):
root@iothub:~ # visudo
Add the following entry:
admin ALL=(ALL:ALL) ALL
Note. If you forgot to create the
adminuser during installation, you can always use the adduser(8) command to do it on the console.
To test, log in as admin:
root@iothub:~ # su - admin
...
As the admin user, try running sudo with a trivial command, e.g.,
admin@iothub:~ # sudo ls

We trust you have received the usual lecture from the local System
Administrator. It usually boils down to these three things:

    #1) Respect the privacy of others.
    #2) Think before you type.
    #3) With great power comes great responsibility.
You will be prompted for your (admin) password, at which point you will get a stern warning about the responsibilities on your shoulders with this awesome power at your fingertips. And then the output of ls.
Use SSH to log in
Verify that you can log into the iothub host using ssh from another machine on your network as the admin user:
user@myhost:~ # ssh admin@iothub
Since this is the first time you will be logging into this host via ssh, you will be prompted to verify the authenticity of the host (and presented with the host’s SSH public key fingerprint). Assuming you trust the node you are connecting to (as well as your network infrastructure), type yes to proceed.
Note: You cannot ssh into FreeBSD as the
rootuser, as a security precaution.
Assuming you accept the server’s public key and entered the correct password, you should be able to log in.
Once logged in, you can log in as root using sudo:
admin@iothub:~ # sudo -i
Password:
For this point, you can perform administrative operations remotely from another machine as the root user.
Configuring Wireless AP
Assuming you have a wireless card in the machine, you can get the device name as follows:
root@iothub:~ # sysctl net.wlan.devices
net.wlan.devices: ath0
You can get some more information about the device by grepping through the output of dmesg:
root@iothub:~ # dmesg | grep ath0
ath0: <Atheros 9285> mem 0xf7d00000-0xf7d0ffff irq 16 at device 0.0 on pci2
ath0: [HT] enabling HT modes
ath0: [HT] 1 stream STBC receive enabled
ath0: [HT] 1 RX streams; 1 TX streams
...
And still more via pciconf:
root@iothub:~ # pciconf -lc ath0
ath0@pci0:2:0:0:	class=0x028000 rev=0x01 hdr=0x00 vendor=0x168c device=0x002b subvendor=0x17aa subdevice=0x30a1
    cap 01[40] = powerspec 3  supports D0 D1 D3  current D0
    cap 05[50] = MSI supports 1 message
    cap 10[60] = PCI-Express 2 legacy endpoint max data 128(128)
                max read 512
                link x1(x1) speed 2.5(2.5) ASPM disabled(L0s/L1)
    ecap 0001[100] = AER 1 0 fatal 0 non-fatal 0 corrected
    ecap 0002[140] = VC 1 max VC0
    ecap 0003[160] = Serial 1 001517ffff241412
    ecap 0004[170] = Power Budgeting 1
Add the following lines to your /etc/rc.conf file:
    # Wireless AP
    wlans_ath0="wlan0"
    create_args_wlan0="wlanmode hostap"
    ifconfig_wlan0="inet 10.0.100.1 netmask 255.255.255.0"
This will create a wireless interface with the IP address 10.0.100.1 in the 10.0.100.0/24 network.
Restart the network interface (or reboot the machine):
root@iothub:~ # service netif restart
...
You should now have a new interface called wlan0:
root@iothub:~ # ifconfig wlan0
wlan0: flags=8c43<UP,BROADCAST,RUNNING,OACTIVE,SIMPLEX,MULTICAST> metric 0 mtu 1500
    ether 74:e5:43:2d:d5:3c
    inet 10.0.100.1 netmask 0xffffff00 broadcast 10.0.100.255
    groups: wlan
    ssid "" channel 8 (2447 MHz 11g)
    regdomain 101 indoor ecm authmode OPEN privacy OFF txpower 20
    scanvalid 60 protmode CTS wme burst dtimperiod 1 -dfs bintval 0
    parent interface: ath0
    media: IEEE 802.11 Wireless Ethernet autoselect <hostap> (autoselect <hostap>)
    status: no carrier
    nd6 options=29<PERFORMNUD,IFDISABLED,AUTO_LINKLOCAL>
Setting up the Host AP daemon
The Host AP daemon (hostapd) is a background process that will authenticate users/devices that wirelessly connect to the iothub over 802.11 wireless protocols.
Note. For this device, I am using 802.11g (2.4Ghz), since that is the protocol that the ESP32 devices (and most clients) support.
The following instructions are taken from this excellent tutorial.
First, check that the HOSTAP capability is in the interface driver’s capabilities:
root@iothub:~ # ifconfig wlan0 list caps
drivercaps=4f8def41<STA,FF,IBSS,PMGT,HOSTAP,AHDEMO,TXPMGT,SHSLOT,SHPREAMBLE,MONITOR,MBSS,WPA1,WPA2,BURST,WME,WDS,TXFRAG>
cryptocaps=1f<WEP,TKIP,AES,AES_CCM,TKIPMIC>
htcaps=7014e<CHWIDTH40,SHORTGI40>
Note. If the driver for your wireless card does not support
HOSTAP, you may need to replace it with a card who’s FreeBSD driver does.
Create a new file /etc/hostapd.conf with the following contents:
# The name of our access point. An SSID (Service Set IDentifier) is the wifi
# name broadcast to all 802.11 wireless local area network (WLAN) clients.
# Spaces and new line "\n" characters are allowed and the string is case
# sensitive.
ssid=iothub

# Send empty SSID in beacons and ignore probe request frames that do not
# specify full SSID, i.e., require stations to know SSID.
# default: disabled (0)
# 1 = send empty (length=0) SSID in beacon and ignore probe request for
#     broadcast SSID
# 2 = clear SSID (ASCII 0), but keep the original length (this may be required
#     with some clients that do not support empty SSID) and ignore probe
#     requests for broadcast SSID
# ignore_broadcast_ssid=1

# The security password or pass phrase. The correct WPA pass phrase is required
# by all Wifi clients before being allowed to connect to the Access point (AP).
# Long strings have greater entropy compared to short, complicated passwords.
# Spaces are allowed and the string is case sensitive.
wpa_passphrase=************

# The WiFi channel. Specify the channel number and the driver will set the
# proper frequency, 2.4GHz or 5GHZ, and the allowed transmit power (txpower).
# The list of available channels supported by the hardware and driver can be
# queried using, "ifconfig -v wlan0 list channel" . Default channels in the US
# are: 1, 2, 3, 4  5, 6, 7, 8, 9, 10, 11 for 2.4GHz networks and 36, 40, 44, 48
# for 20dBm low power 5GHz and 149, 153, 157, 161, 165 for 30dBm high power
# 5GHz. Recommended channels are 1, 6, or 11 for 2.4GHz networks and 149,
# 153, 157, 161 or 165 for 5GHz networks.
channel=11

# The wireless LAN interface the ath0 card was created with. wlan0 is the default.
interface=wlan0

# Set the modulation standard, a/b/g . When setting the hw_mode to "g" the
# interface will support 802.11g at 2.4GHz and 802.11a at 5GHz. This is a
# limitation of the ath0 driver in FreeBSD 10. In FreeBSD 11 the driver will
# be updated and 802.11n will become available by enabling ieee80211n . 802.11n
# supports ht/40+ , both 20 MHz and 40 MHz wide multiple-input multiple-output
# (MIMO) streams increasing throughput to 450 Mbps.
hw_mode=g
#ieee80211n=1
wmm_enabled=1

# Authorization type. The following requires the client to authenticate using
# WPA2 / 802.11i mode using a single password for all users specified above
# using "wpa_passphrase". CCMP requires the connection to use AES encryption.
auth_algs=3
wpa=2
wpa_key_mgmt=WPA-PSK
wpa_pairwise=CCMP
rsn_pairwise=CCMP

# Wifi thresholds defined to govern the size of packets and the number of
# beacons as specified by our access point (AP). We choose to increase the
# beacon interval from 100ms to 1000ms to reduce the beacon traffic overhead. A
# higher beacon interval increases the throughput of the access point by
# only two(2) to three(3) megabits at most.
beacon_int=1000
dtim_period=2
max_num_sta=255
rts_threshold=2347
fragm_threshold=2346

# Log all "informational messages" and above to syslog.
logger_syslog=-1
logger_syslog_level=2

# System files
# DEPRECATED dump_file=/tmp/hostapd.dump
ctrl_interface=/var/run/hostapd
ctrl_interface_group=0
Set the wpa_passphrase configuration variable to the wireless AP password you would like to use. For now, leave the ignore_broadcast_ssid entry commented out. We will return to this later.
Note. The hostapd(8) and hostapd.conf(5) man pages are a little light on detail. However, you can find some useful examples with extensive comments in
/usr/share/examples/hostapd.
Add the following line to your /etc/rc.conf file:
hostapd_enable="YES"
gateway_enable="YES"
Note. FreeBSD will not route packets across interfaces by default. In order to allow the kernel to do so, we need to turn the host into a router by enabling it as a gateway.
Start the hostapd daemon:
root@iothub:~ # service hostapd start
Check the ssid via ifconfig:
root@iothub:~ # ifconfig wlan0
wlan0: flags=8943<UP,BROADCAST,RUNNING,PROMISC,SIMPLEX,MULTICAST> metric 0 mtu 1500
    ether 74:e5:43:2d:d5:3c
    inet 10.0.100.1 netmask 0xffffff00 broadcast 10.0.100.255
    groups: wlan
    ssid iothub channel 6 (2437 MHz 11g ht/20) bssid 74:e5:43:2d:d5:3c
    regdomain 101 indoor ecm authmode WPA2/802.11i privacy MIXED
    deftxkey 2 AES-CCM 2:128-bit txpower 20 scanvalid 60 protmode CTS
    ampdulimit 64k ampdudensity 8 shortgi -stbctx stbcrx -ldpc -uapsd wme
    burst dtimperiod 1 -dfs
    parent interface: ath0
    media: IEEE 802.11 Wireless Ethernet autoselect mode 11ng <hostap>
    status: running
    nd6 options=29<PERFORMNUD,IFDISABLED,AUTO_LINKLOCAL>
You should now be able to see the iothub network when scanning for WiFi networks, from, for example, a Windows or unix-like client.
Note. You can try to connect to this network from a laptop, for example. But you won’t be assigned an IP address and wont have any networking. Save that test for later (see below).
Setting up DHCP and DNS services
In addition to authenticating users, one of the roles of the wireless AP endpoint is to serve as a DHCP server (to dispense IP addresses to IoT devices), as well as a DNS server for the local network. In the iothub host, we will also be running services inside the machine (on theh 10.0.100.0/24 network) which will have static IPs, and the DNS server should be able to resolve these addresses, as well.
It turns out that FreeBSD ships with a version of the NLNetLabs unbound DNS server, called local-unbound(8). I would not be able to describe the main differences between local-unbound and unbound, except to say that both seem capable of serving as local DNS servers. The Internet Systems Consortium’s’ DHCP server is also a fully functional Dynamic Host Configuration Procotol server, and I was able to get that to run, as well. However, I was not able to find a way to easily bind the two together, so that when an IoT device connects to the AP, its host name is registered with the DNS server, a feature I would like to see work.
Note. If anyone has any experience integrating
unboundand the FreeBSDdhcpd, I am all ears. I’d love to use as much out-of-the-box software as possible for this project. Please reach out if you have any insight!
Instead, I decided to just roll with dnsmasq, a very nice (GPL) combined DHCP and DNS service, which seems to automatically integrate DHCP and DNS services in the way I want it to.
The FreeBSD dnsmasq(8) port is available via the FreeBSD pkg tool:
root@iothub:~ # pkg install dnsmasq
...
Like all FreeBSD ports, the dnsmasq daemon and config files can be found under the /usr/local/ tree.
There is a nice tutorial for setting up and configuring dnsmasq on UNIX-like operating systems. We follow the instructions in this tutorial here.
The default /usr/local/etc/dnsmasq.conf has a ton of configuration items, all of which are commented out to use defaults, and which also contain extensive documentation.
Following instructions from tutorial above and slightly tailored for this host, the uncommented configuration ends up looking like the following:
root@iothub:~ # grep -e '^[^#].*$' /usr/local/etc/dnsmasq.conf
domain-needed
bogus-priv
strict-order
no-resolv
server=8.8.8.8
interface=wlan0
bind-interfaces
expand-hosts
domain=iothub
dhcp-range=10.0.100.100,10.0.100.200,12h
log-queries
log-dhcp
log-facility=/var/log/dnsmasq.log
Because all of the entries in the default /usr/local/etc/dnsmasq.conf are commented out, you can simply append (or even replace) these values to this file.
The dnsmasq server will use entries in /etc/hosts to resolve statically defined IP addresses. Add following entry to /etc/hosts:
10.0.100.1 gw.iothub gw
This will allow hosts in the 10.0.100.0/24 subnet to resolve statically assinged addresses on this network.
Note. We will add more entries to this file in Part 2 of this blog post.
Enable dnsmasq in /etc/rc.conf:
dnsmasq_enable="YES"
Start the dnsmasq service:
root@iothub:~ # service dnsmasq start
You should now be able to resolve the gw address, using the dnsmasq server (running on 10.0.100.1):
root@iothub:~ # host gw 10.0.100.1
Using domain server:
Name: 10.0.100.1
Address: 10.0.100.1#53
Aliases:

gw has address 10.0.100.1
Note. The
dnsmasqserver is not intended to server DNS requests for clients running on theiothubhost. Presumably, theiothubhost is using a DNS server provided by the network to which it is connected (e.g., a home router or cable modem). Instead, thednsmasqserver is intended for use by clients on the10.0.100.0/24subnet, which we will build below.
Building the iothub (internal) Network
The iothub host now has two network interfaces, the interface associated with the ethernet port on the host, and the new wireless AP we added above. On the this particular machine, the ethernet interface is named re0, and we created the wlan0 wireless interface above.
The iothub host will not only be an AP for IoT devices, we would also like it to host a collection of services that will aggregate, store, and present the data to users, and for this we will use the FreeBSD jail(8) facility, which will allow us to deploy services into isolated, lightweight containers that run on the iothub host.
We’ll add specific services in a subsequent blog post. For now, we just want to set up the internal network so that:
- No (IoT) devices that connect to the wireless AP can access the outside world through the
re0(ethernet) interface. We want this to be a private network, at least for the IoT devices, which should be considered “untrusted”; - IoT devices should have access to addresses in the
10.0.100.0/24network. One could theoretically lock down only the services and ports that these devices require (e.g., an MQTT endpoint), but such rules could be added later; - Services residing in jails on the
10.0.100.0/24network should have access to the outside world, at least when needed for system updates or access to cloud services; - Devices making requests into the
iothubfrom there0network should only have access to services that are exposed (or more likely, mapped). For example, if a jail provides a user interface for querying and viewing aggregated data from IoT devices, the port needed to access that data should be exposed on there0interface.
We will build a virtual network inside the iothub host that satisfies these requirements by using a combination of FreeBSD jails (using the the FreeBSD vnet(9) facility), bridges (using the if_bridge(4) driver), and packet filtering (using the pf(4) packet filter).
Figure 2 illustrates the internal network we will build:
        +---------------------------------------------------------+
        |                       dnsmasq (DHCP+DNS)                |
        |                                              10.0.100.1 | HostAP
     +----+                 +-------------+                    +----+
-----o    o-----------------o   gateway   o-------+------------o    | )))
     +----+                 +-------------+       |            +----+
        | re0                   pf f/w            |         wlan0 |
        |                                         |               |
        |                                         |               |
        |   +-------------------------------------o-----------+   |
        |   |                bridge (iothub)                  |   |
        |   +-----o------------o------------o------------o----+   |
        |         |            |            |            |        |
        |         |            |            |            |        |
        |         |            |            |            |        |
        |         |            |            |            |        |
        |   +-----o----+ +-----o----+ +-----o----+ +-----o----+   |
        |   |10.0.100.2| |10.0.100.3| |10.0.100.4| |10.0.100.5|   |
        |   |  jail 1  | |  jail 2  | |  jail 3  | |  jail 4  |   |
        |   |          | |          | |          | |          |   |
        |   +----------+ +----------+ +----------+ +----------+   |
        +---------------------------------------------------------+
        iothub host
                                 Figure 2.  Internal iothub network
Note. The “gateway” box in
Figure 2is more of a logical entity and does not represent a service or entity “between” there0andwlan0interfaces. It is more of a logical depiction of thepfconfiguration we will build that enforce packet filtering and port mapping rules between there0andiothubnetworks.
Creating the Bridge
To create the bridge, all we need to do is use the ifconfig tool to create it, and add the wlan0 interface as a member. I rename the device as iothub, for readability:
ifconfig bridge1 create
ifconfig bridge1 name iothub
ifconfig iothub addm wlan0 up
To make this change permanant, we add the following lines to our /etc/rc.conf file:
cloned_interfaces="bridge1"
ifconfig_bridge1_name="iothub"
ifconfig_iothub="addm wlan0 up"
You can now view the interface via ifconfig:
root@iothub:~ # ifconfig iothub
iothub: flags=8843<UP,BROADCAST,RUNNING,SIMPLEX,MULTICAST> metric 0 mtu 1500
    ether 58:9c:fc:10:ff:c5
    id 00:00:00:00:00:00 priority 32768 hellotime 2 fwddelay 15
    maxage 20 holdcnt 6 proto rstp maxaddr 2000 timeout 1200
    root id 00:00:00:00:00:00 priority 32768 ifcost 0 port 0
    member: wlan0 flags=143<LEARNING,DISCOVER,AUTOEDGE,AUTOPTP>
            ifmaxaddr 0 port 3 priority 128 path cost 66666
    groups: bridge
    nd6 options=9<PERFORMNUD,IFDISABLED>
Later, we will be adding our jail interfaces to this bridge, so that jails can communicate directly on the 10.0.100.0/24 network.
Hardening with Pf
We will use the pf(4) packet filter to enforce firewall rules for the iothub host.
Start by creating /etc/pf.conf:
# macros
ext_if="re0"
wifi_if="wlan0"

# return blocked packets instead of dropping them
set block-policy return

# pass on localhost
set skip on lo

# Uncomment when jails need internet access (e.g., installs, upgrades, etc)
# WARNING.  You should shut down hostap support on wlan0 when enabled, in order
# to prevent IP or MAC spoofing from devices attached over WiFi.
# nat on $ext_if from 10.0.100.2 - 10.0.100.5 to !($ext_if) -> ($ext_if)

# Port-map $ext_if:80 to grafana:3000
# We will uncomment this in Part 2
# rdr pass log on $ext_if proto tcp from any to any port 80 -> 10.0.100.4 port 3000

# default, block everything, in and out, all interfaces
block all

# allow port 22 (tcp) in through external interface
pass in log on $ext_if proto tcp from any to ($ext_if) port 22

# allow traffic out on the external interface, except for anything coming from the wifi interface
# Note that this rule will not apply to NAT'd addresses
pass out log on $ext_if
block out log on $ext_if from $wifi_if:network to any

# anything goes on the wifi interface
pass on $wifi_if

# Let ICMP through
pass out log inet proto icmp from any to any keep state
pass in log quick inet proto icmp from any to any keep state
These pf rules warrant some explanation. In essence:
- All traffic from the ethernet port into the
iothubhost is blocked, except ssh and (plain) http; - Traffic is allowed out of the ethernet interface, except traffic that originates from the Wifi interface;
- All hosts within the
itohubsubnet (10.0.100.0/24) can communicate with one-another; - No hosts within the
iothubsubnet can otherwise traverse the gateway and egress through the ethernet interface.
Noe that there are a few rules in this file that are commented out, which we will return to later in Part 2 of this series.
Add the following lines to /etc/rc.conf:
pf_enable="YES"                 # Enable PF (load module if required)
pf_rules="/etc/pf.conf"         # rules definition file for pf
pf_flags=""                     # additional flags for pfctl start up
pflog_enable="YES"              # start pflogd(8)
pflog_logfile="/var/log/pflog"  # where pflogd should store the logfile
pflog_flags=""                  # additional flags for pflogd start up
Start the pf packet filter:
root@iothub:~ # service pf start
Note. You may get kicked off of the machine when
pfstarts, if you are connected overssh. You should be able to log back in.
Intermission
At this point, it is a good idea to restart the iothub host and verify that all of the settings you have configured are permanant and will survive a restart.
root@iothub:~ # reboot
Testing Access
You should now be able to test access to your wireless AP network.
Connect to to the iothub wireless network, using the password you set in the /etc/hostapd file.
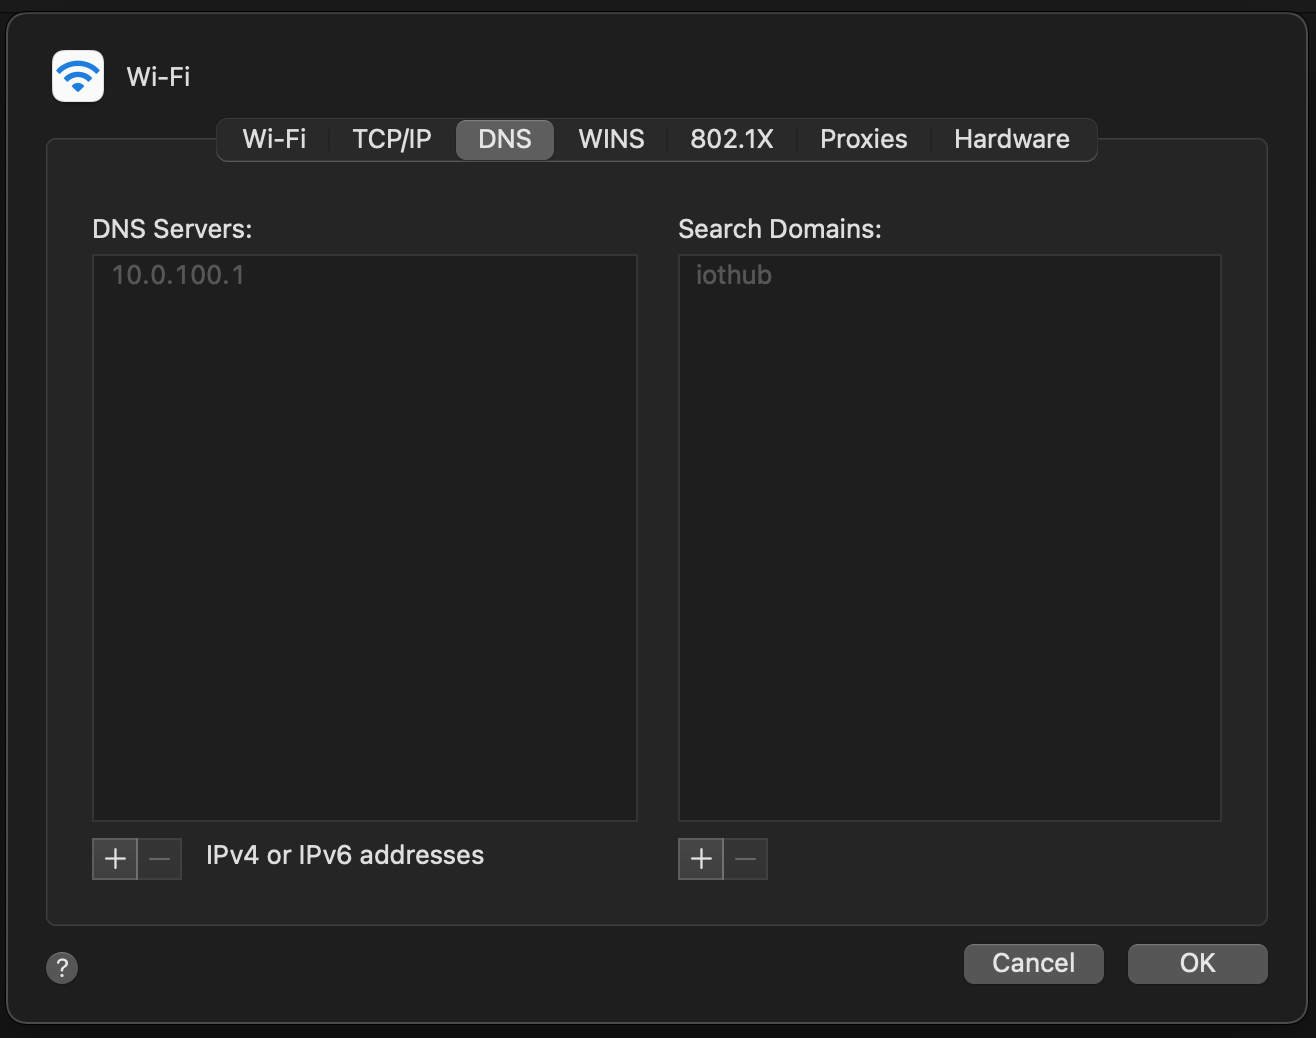
You should be assigned an IP address in the range you configured in the /usr/local/etc/dnsmasq.conf file. For example, on a macOS client you might see something like the following in the Network system properties:
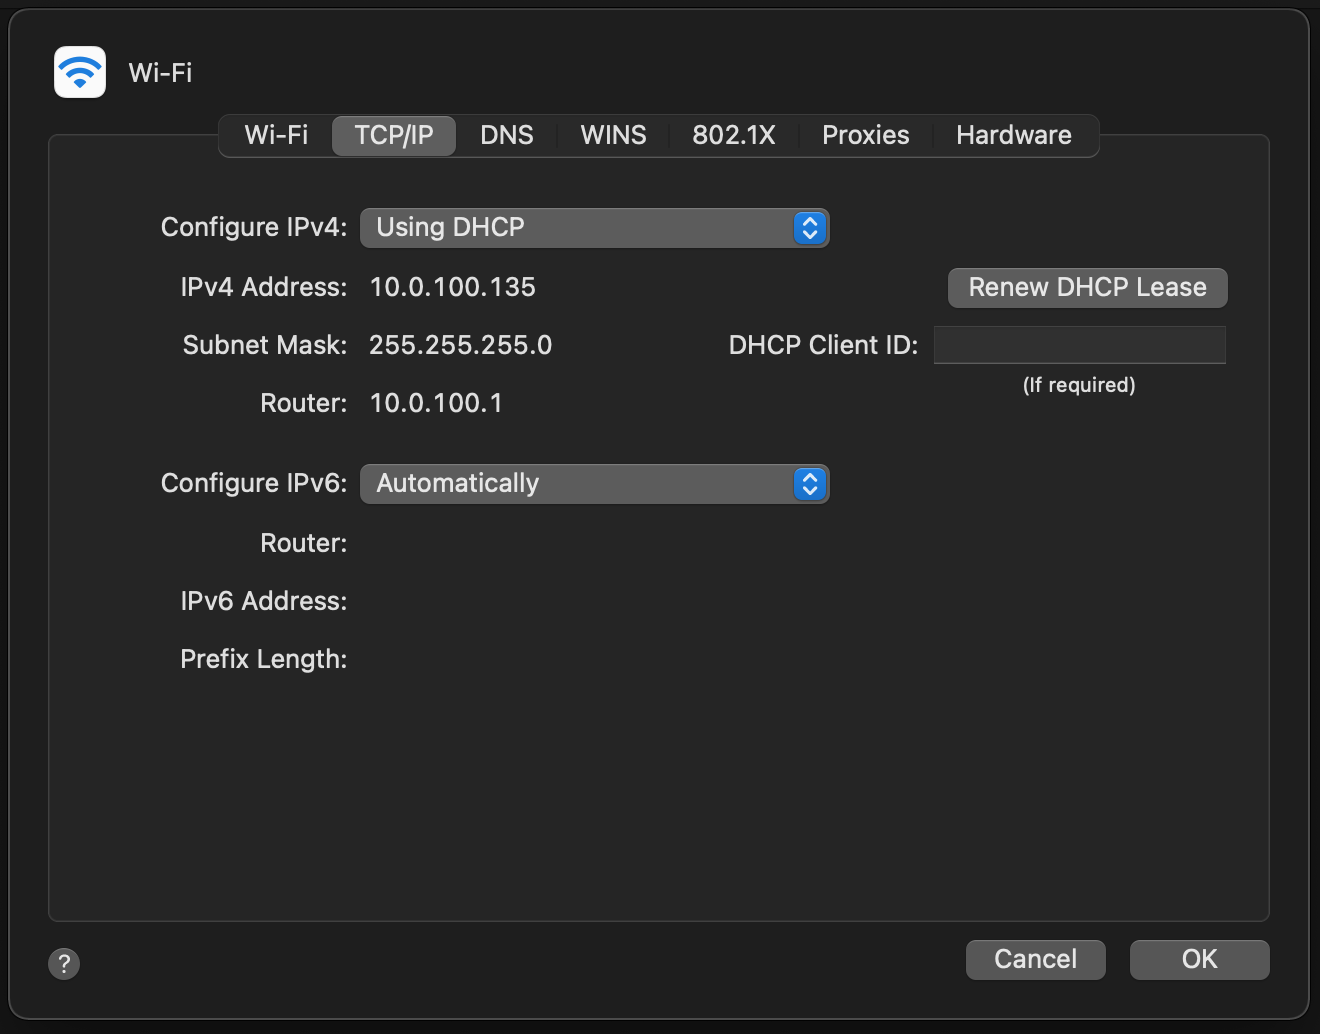
and
Or via the command line:
user@myhost:~ # ifconfig en1
en1: flags=8863<UP,BROADCAST,SMART,RUNNING,SIMPLEX,MULTICAST> mtu 1500
    options=400<CHANNEL_IO>
    ether b8:09:8a:be:5d:75
    inet6 fe80::34:80e4:4102:b31d%en1 prefixlen 64 secured scopeid 0x5
    inet 10.0.100.135 netmask 0xffffff00 broadcast 10.0.100.255
    nd6 options=201<PERFORMNUD,DAD>
    media: autoselect
    status: active
Assuming this is your only connection to the network, you should be able to resolve the gw host:
user@myhost:~ # host gw
gw.iothub has address 10.0.100.1
as well as ping it:
user@myhost:~ # ping -c 5 gw
PING gw.iothub (10.0.100.1): 56 data bytes
64 bytes from 10.0.100.1: icmp_seq=0 ttl=64 time=0.996 ms
64 bytes from 10.0.100.1: icmp_seq=1 ttl=64 time=1.772 ms
64 bytes from 10.0.100.1: icmp_seq=2 ttl=64 time=1.960 ms
64 bytes from 10.0.100.1: icmp_seq=3 ttl=64 time=1.930 ms
64 bytes from 10.0.100.1: icmp_seq=4 ttl=64 time=1.797 ms

--- gw.iothub ping statistics ---
5 packets transmitted, 5 packets received, 0.0% packet loss
round-trip min/avg/max/stddev = 0.996/1.691/1.960/0.355 ms
You should even be able to ssh into the gw host as the admin user, since gw is the iothub host:
user@myhost:~ # ssh gw
...
However, you should not be able to reach outside of the 10.0.100.0/24 network:
user@myhost:~ # ping freebsd.org
PING freebsd.org (96.47.72.84): 56 data bytes
Request timeout for icmp_seq 0
Request timeout for icmp_seq 1
Request timeout for icmp_seq 2
^C
--- freebsd.org ping statistics ---
4 packets transmitted, 0 packets received, 100.0% packet loss
We now have a private wireless network for our IoT devices!
Next Time
In Part 2 of this series, we will talk about the services we will deploy inside various jails and how they work with IoT devices. Stay tuned!
Resources
The following resources were indispensible in sorting out how to build and configure the iothub host.
Guides
- FreeBSD Handbook Advanced Networking chapter. Helpful information about how to configure routes, bridges, wireless, and other helpful information.
- OpenBSD Pf User’s Guide Helpful expository documentation about the OpebBSD Pf firewall. Not a substitute, but an addendum, for the man pages.
Tutorials
- CALOMEL’s FreeBSD Wireless Access Point provides good instructions for setting up a wireless AP. I tried using the FreeBSD
dhcpdandlocal-unboundservices together, which works for statically assigned IPs, but I couldn’t get hosts that get assigned IPs via thedhcpddaemon to register their names withlocal-unbound. Perhaps there is a way (I think I had read that OpnSense has some scripts that do it), but I couldn’t find and easy way to do it. - iceflatline’s How to Install and Configure dnsmasq walks through which
dnsmasqsettings should be configured. The tutorial is aimed at BSD and FreeBSD systems.
Books
I can’t recommend Michael W. Lucas’ books enough. They are informative, insightful, and entertaining. They really hit the sweet spot when it comes to providing the right amount of detail without being overwhelming or insulting.
Manual Pages
Thanks
Thanks go to my networking mentor Vlad and IoT partner-in-crime @UncleGrumpy for advice and encouragement.