Running AtomVM on MacOS and an ESP32
In my previous blog post, I tried to explain why the Erlang/OTP BEAM (and specifically, AtomVM) is a compelling platform for development on micro-controllers. If you’ve made it to this page, I might have convinced you, or you might be here because you, too, have an interest in running Erlang or Elixer programs on cheap embedded devices.
In this blog post, I want to show how to set up a development environment on MacOS, so that you can build and test AtomVM on your Mac. In addition, we include steps for connecting to an ESP32 device, and flashing the device with the AtomVM runtime and the “Hello World” of the IoT world, blinky.
What is AtomVM?
Let’s start with an understanding of AtomVM.
AtomVM is a “virtual machine” (what used to be called an abstract machine, in functional and logic programming circles), capable of executing a subset of the BEAM instruction set.
The BEAM (short for “Björn’s Erlang Abstract Machine”) was designed primarily to implement programs that were written in the Erlang programming language, though more recently, additional languages have been designed to target the same instruction set (such as Elixer, and Lisp Flavored Erlang, or LFE). This is analogous to how programming languages like Scala, Clojure, and Groovy target the Java Virtual machine (JVM). If you are interested in the BEAM, the Erlang Runtime System book is a very useful and informative reference.
AtomVM can be compiled to run on a Linux or MacOS machine (similar to how Micropython can run on UNIX machines). Having AtomVM run on a desktop of laptop can be very useful for debugging, as there are typically better tools for analyzing the runtime characteristics of the system.
AtomVM can also be cross-compiled for micro-controller architectures, and currently, the one supported architecture is the Xtensa 32-bit LX6 microprocessor, available on the Espressif ESP32 integrated system on a chip (SoC).
One of the most exciting features of the ESP SoCs (ESP8266 and ESP32) is the board’s on-board integration with 802.11 and bluetooth networking, making them applicable to “Internet of Things” (IoT) applications. For example, these devices are small and draw (relatively) little power, so they are ideal for integration into home and industrial wireless applications. The devices are also relatively cheap and accessible to hobbyists and enthusiasts, with fully integrated development boards costing less than $10.
These instructions will cover building AtomVM for both MacOS and the ESP32.
Hardware
Presumably the reason you are interested in AtomVM is that you want to run a Erlang code on a micro controller, like the ESP32.
ESp32 boards can be found on Ali Express for around $3.00, and if you are feeling adventurous, you can buy an ESP32 board, solder it up to an ESP32 adapter board, plug into a bread board, figure out where to place all the required resistors and capacitors, and wire it up to a UART serial controller of your choice. I have done that with ESP8266 boards, and it has been a useful learning experience. However, for the purposes of this blog, I am using a fully integrated development board, which includes the USB serial adapter. The cost is only a few dollars more, and for development, this is an acceptable way to go. (You might decide to build your own circuit boards with basic ESP32 boards, if you ever bring your application into production, but we are a ways away from that!)
I found a decent development board on Amazon (the HiLetgo ESP-WROOM-32), for around $11. I could do better on Ali Express, but this board comes with the Silicon Labs CP2102 UART controller, for which I already have the driver installed on my machine. For instructions about locating and installing the driver for this chip set, see the instructions here.
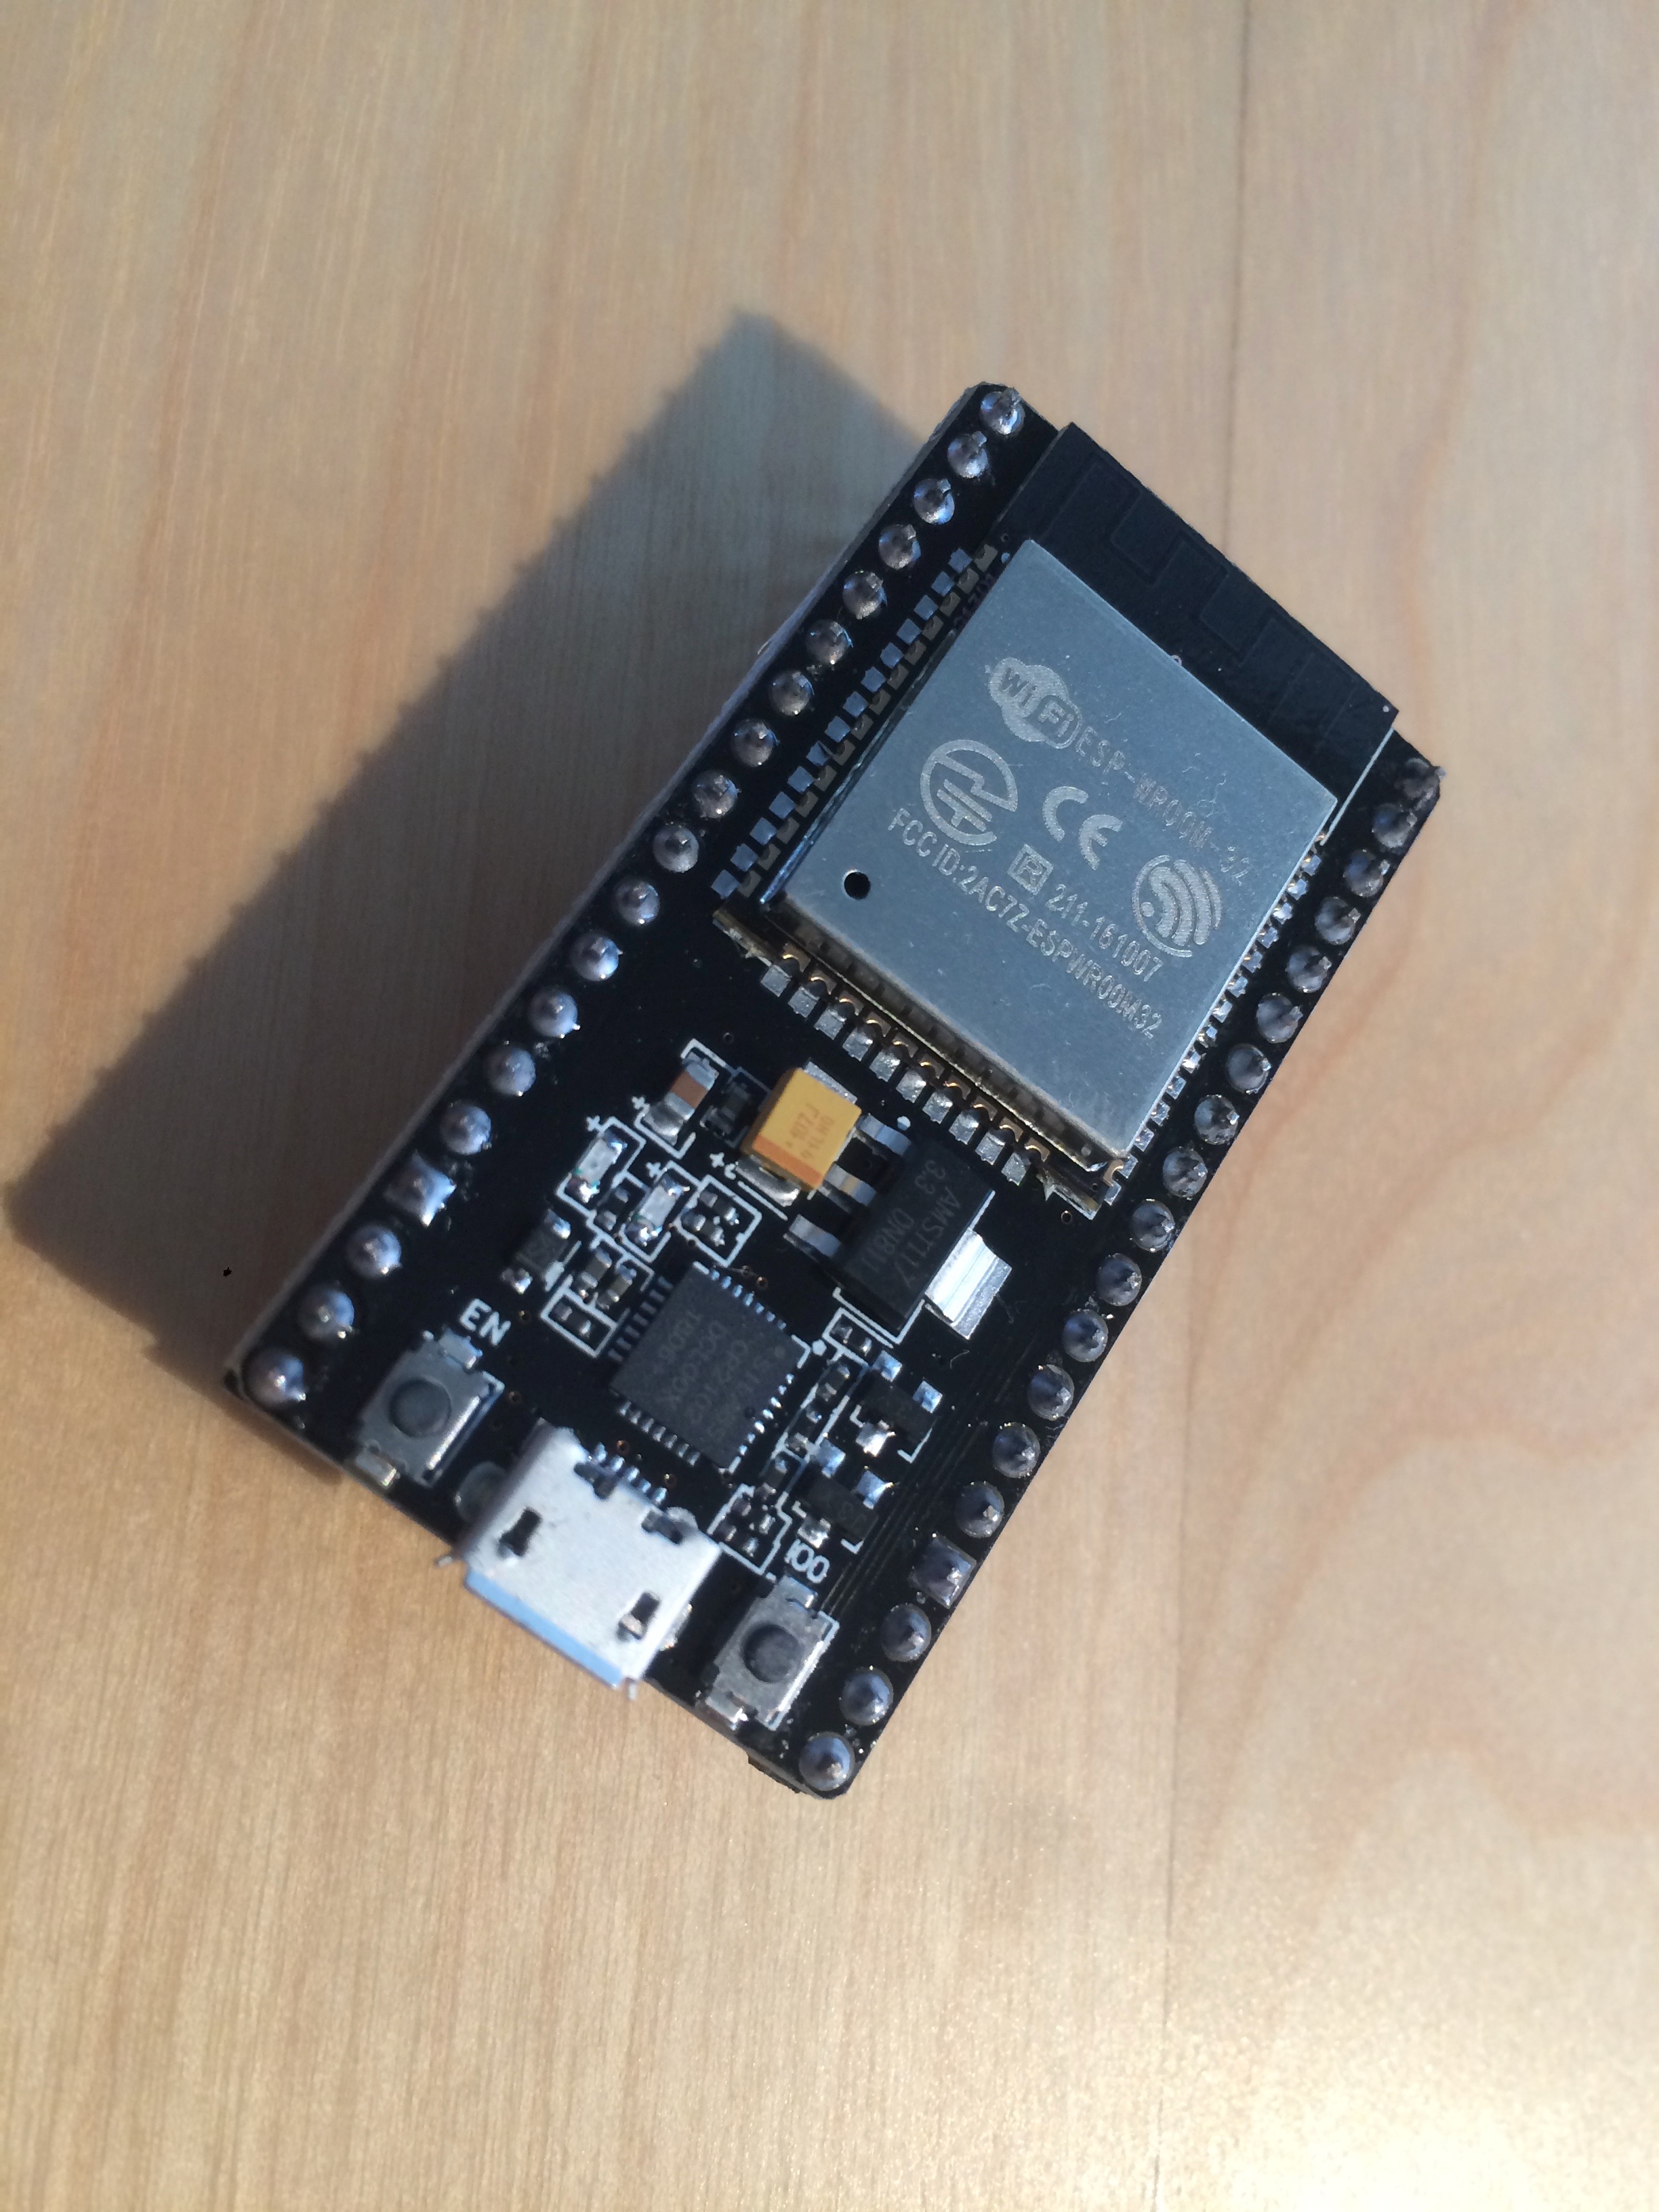
With this development board, a micro-USB cable, and the Silicon Labs driver for the CP2102 serial adapter, you are good to go.
Building AtomVM for Unix-like Operating Sytems
Building AtomVM on a desktop or laptop is a useful starting point, as it can be helpful to debug or test you application first on a MacOS, FreeBSD, or Linux machine, and then “flash” it (i.e., upload) to an ESP dev board.
So let’s start with building AtomVM on a Mac. Most of the instructions (except for locating and installing prerequisite software) should be the same for FreeBSD or Linux. Consult your local documentation for details.
On MacOS, you will need a few pieces of software to get off the ground.
Follow the instructions on the above web sites for installing these components, if you don’t already have them installed.
Linux and FreeBSD users should already have a compiler and package manager on your machines, so the above steps should not be needed on those platforms.
Once you have home-brew installed, you can install a few additional components.
Start by installing cmake, the meta-build system
shell$ brew install cmakeYou will also need gperf:
shell$ brew install gperfIf you don’t already have git, you should also install it:
code>shell$ brew install git</code>
Currently, AtomVM only supports Erlang modules compiled under Erlang R20. You can install R20 via brew, as well:
shell$ brew install erlang@20You can then put this version of Erlang on your PATH, in case you already have a version of Erlang installed on your machine:
shell$ export PATH="/usr/local/opt/erlang@20/bin:$PATH"
Build AtomVM
The AtomVM project can be found on GitHub. Find a suitable location on your disk,
shell$ git clone https://github.com/bettio/AtomVM
...
You can now build AtomVM. The instructions should be the same for all UNIX-like operating systems.
shell$ cd AtomVM
shell$ mkdir build
shell$ cd build
shell$ cmake ..
-- The C compiler identification is AppleClang 10.0.0.10001145
-- The CXX compiler identification is AppleClang 10.0.0.10001145
-- Check for working C compiler: /Applications/Xcode.app/Contents/Developer/Toolchains/XcodeDefault.xctoolchain/usr/bin/cc
-- Check for working C compiler: /Applications/Xcode.app/Contents/Developer/Toolchains/XcodeDefault.xctoolchain/usr/bin/cc -- works
-- Detecting C compiler ABI info
-- Detecting C compiler ABI info - done
-- Detecting C compile features
-- Detecting C compile features - done
-- Check for working CXX compiler: /Applications/Xcode.app/Contents/Developer/Toolchains/XcodeDefault.xctoolchain/usr/bin/c++
-- Check for working CXX compiler: /Applications/Xcode.app/Contents/Developer/Toolchains/XcodeDefault.xctoolchain/usr/bin/c++ -- works
-- Detecting CXX compiler ABI info
-- Detecting CXX compiler ABI info - done
-- Detecting CXX compile features
-- Detecting CXX compile features - done
-- Found ZLIB: /usr/lib/libz.dylib (found version "1.2.11")
-- Configuring done
-- Generating done
-- Build files have been written to: /work/src/github/fadushin/AtomVM/build
This will generate make files for your project, and all build artifacts, including the AtomVM executable, will be created under your build directory.
Note that CMake will keep your source and build artifacts separate (except currently for some compiled Erlang tests and examples. You will find all of the AtomVM executables under thebuilddirectory (or wherever you rancmakefrom).
You can now run make:
shell$ make
Scanning dependencies of target generated
[  1%] Hashing /work/src/github/fadushin/AtomVM/src/libAtomVM/bifs.gperf
[  1%] Built target generated
Scanning dependencies of target generated-nifs-hash
[  2%] Hashing /work/src/github/fadushin/AtomVM/src/libAtomVM/nifs.gperf
[  2%] Built target generated-nifs-hash
Scanning dependencies of target libAtomVM
[  2%] Building C object src/libAtomVM/CMakeFiles/libAtomVM.dir/atom.c.o
[  3%] Building C object src/libAtomVM/CMakeFiles/libAtomVM.dir/atomshashtable.c.o
[  3%] Building C object src/libAtomVM/CMakeFiles/libAtomVM.dir/avmpack.c.o
[  4%] Building C object src/libAtomVM/CMakeFiles/libAtomVM.dir/bif.c.o
[  4%] Building C object src/libAtomVM/CMakeFiles/libAtomVM.dir/context.c.o
...
If this ran cleanly, then congratulations! You now have AtomVM built on your machine!
Run AtomVM Tests
You can run the tests by running the test-erlang program in the tests directory:
shell$ tests/test-erlang
Seed is 1542509601
-- EXECUTING TEST: add.beam
-- EXECUTING TEST: fact.beam
-- EXECUTING TEST: mutrec.beam
-- EXECUTING TEST: morelabels.beam
-- EXECUTING TEST: biggerintegers.beam
-- EXECUTING TEST: biggerdifference.beam
-- EXECUTING TEST: moreintegertests.beam
-- EXECUTING TEST: send_receive.beam
...
-- EXECUTING TEST: complex_struct_size0.beam
-- EXECUTING TEST: complex_struct_size4.beam
-- EXECUTING TEST: make_garbage0.beam
-- EXECUTING TEST: make_garbage3.beam
-- EXECUTING TEST: make_garbage6.beam
-- EXECUTING TEST: make_garbage7.beam
-- EXECUTING TEST: copy_terms7.beam
-- EXECUTING TEST: copy_terms8.beam
This should give you confidence that AtomVM is running well on your platform.
Run hello_world!
You can also run a simple “hello world” program that has been built for you as part of the build process. This program is quite simple. It uses the console module to print “Hello World” to the screen:
-module (hello_world).
-export([start/0]).

start() ->
    console:puts("Hello World\n").
This program requires the console module, which is part of the eavmlib library. This library gets automatically added to the hello_world.avm AVM file, when you build AtomVM.
You can run this program as an argument to the AtomVM program:
shell$ src/AtomVM examples/erlang/hello_world.avm
Hello World
Return value: 28b
Congratulations! You have just run your first Erlang program on AtomVM (albeit on a personal computer, not on a micro-controller – yet).
AtomVM on an ESP32
Running AtomVM on an ESP32 is slightly more involved. We need to install a bit more software to compile the runtime system for the device, as the C code that forms the AtomVM virtual machine needs to be cross-compiled to the instruction set for the Xtensa 32-bit LX6 architecture.
In essence, we need two things:
- The Xtensa compiler (or tool chain)
- The Espressif IoT Development Framework (or ESP-IDF)
Let’s start with the compiler and tool chain. You can find links for pre-built binaries of the tool chain for MacOS and Linux (and even Windows!) here. (I used this version.)
Unpack this compressed tar ball and place it in a well-known location (I used /work/opt, but that’s just me.). The archive should unpack into a directory called xtensa-esp32-elf.
You should set your PATH environment variable to include the bin directory of this package, e.g.,
shell$ xtensa_esp32_home=/work/opt/xtensa-esp32-elf/
shell$ PATH=${xtensa_esp32_home}/bin:$PATH
shell$ export PATH
You should now have the Xtensa compiler tool chain in your PATH environment variable, which will allow the build system to locate the compiler and linker tools needed to build AtomVM for the ESP32.
Next, we need the ESP-IDF framework, the base libraries that AtomVM needs to interface with the ESP32 hardware. You can think of this as like the ESP32 operating system.
You can find the latest version of the framework on the Espressif ESP-IDF releases page on Github. I am currently using version 3.1.1.
This ZIP file should unpack into a directory, which you should also place in a well-known location. (I also used /work/opt).
You should set your IDF_PATH environment variable to the root location of this package, e.g.,
shell$ IDF_PATH=/work/opt/esp-idf-v3.1.1
shell% export IDF_PATH
Note. The AtomVM build system uses the IDF_PATH environment variable to locate common make files and source code for the ESP32. You should not need this environment variable outside of the context of this build.
Finally, if you are on MacOS, you need to have gmake installed on your machine, as some of the make files use idioms only supported on GNU Make, which are not supported on the version of Make that ships with Xcode.
shell$ brew install gmakeBuilding AtomVM for the ESP32
With the Xtensa toolchain and ESP-IDF installed, you should now be able to build AtomVM for the ESP32.
Note that unlike the build for MacOS, FreeBSD, or Linux, the build for the ESP32 requires that you enter the actual source directory under the directory under which you cloned the AtomVM source code (hereafter, atom-vm-src-dir).
You should now be able to build the ESP32 source code using gmake:
Note. This will build a substantial amount of source code.
shell$ cd atom-vm-src-dir/src/platforms/esp32
shell$ gmake
gmake[1]: Entering directory '/work/opt/esp-idf-v3.1.1/tools/kconfig'
cc -c  -DCURSES_LOC="" -DKBUILD_NO_NLS -Wno-format-security  -DLOCALE -MD  /work/opt/esp-idf-v3.1.1/tools/kconfig/mconf.c -o mconf.o
flex -L -P zconf -o zconf.lex.c /work/opt/esp-idf-v3.1.1/tools/kconfig/zconf.l
bison -t -l -p zconf -o zconf.tab.c /work/opt/esp-idf-v3.1.1/tools/kconfig/zconf.y
sed -E "s/\\x0D$//" /work/opt/esp-idf-v3.1.1/tools/kconfig/zconf.gperf | gperf -t --output-file zconf.hash.c -a -C -E -g -k '1,3,$' -p -t
cc -I /work/opt/esp-idf-v3.1.1/tools/kconfig -c  -DCURSES_LOC="" -DKBUILD_NO_NLS -Wno-format-security  -DLOCALE -MD  zconf.tab.c -o zconf.tab.o
/work/opt/esp-idf-v3.1.1/tools/kconfig/lxdialog/check-lxdialog.sh -check cc  -DCURSES_LOC="" -DKBUILD_NO_NLS -Wno-format-security  -DLOCALE -MD -lncurses
cc -c  -DCURSES_LOC="" -DKBUILD_NO_NLS -Wno-format-security  -DLOCALE -MD  /work/opt/esp-idf-v3.1.1/tools/kconfig/lxdialog/checklist.c -o lxdialog/checklist.o
cc -c  -DCURSES_LOC="" -DKBUILD_NO_NLS -Wno-format-security  -DLOCALE -MD  /work/opt/esp-idf-v3.1.1/tools/kconfig/lxdialog/util.c -o lxdialog/util.o
cc -c  -DCURSES_LOC="" -DKBUILD_NO_NLS -Wno-format-security  -DLOCALE -MD  /work/opt/esp-idf-v3.1.1/tools/kconfig/lxdialog/inputbox.c -o lxdialog/inputbox.o
cc -c  -DCURSES_LOC="" -DKBUILD_NO_NLS -Wno-format-security  -DLOCALE -MD  /work/opt/esp-idf-v3.1.1/tools/kconfig/lxdialog/textbox.c -o lxdialog/textbox.o
cc -c  -DCURSES_LOC="" -DKBUILD_NO_NLS -Wno-format-security  -DLOCALE -MD  /work/opt/esp-idf-v3.1.1/tools/kconfig/lxdialog/yesno.c -o lxdialog/yesno.o
cc -c  -DCURSES_LOC="" -DKBUILD_NO_NLS -Wno-format-security  -DLOCALE -MD  /work/opt/esp-idf-v3.1.1/tools/kconfig/lxdialog/menubox.c -o lxdialog/menubox.o
cc -o mconf-idf mconf.o zconf.tab.o lxdialog/checklist.o lxdialog/util.o lxdialog/inputbox.o lxdialog/textbox.o lxdialog/yesno.o lxdialog/menubox.o -lncurses
cc -c  -DCURSES_LOC="" -DKBUILD_NO_NLS -Wno-format-security  -DLOCALE -MD  /work/opt/esp-idf-v3.1.1/tools/kconfig/conf.c -o conf.o
cc -o conf-idf conf.o  zconf.tab.o -lncurses
gmake[1]: Leaving directory '/work/opt/esp-idf-v3.1.1/tools/kconfig'
GENCONFIG
CC build/bootloader/bootloader_support/src/bootloader_random.o
CC build/bootloader/bootloader_support/src/flash_encrypt.o
CC build/bootloader/bootloader_support/src/bootloader_sha.o
CC build/bootloader/bootloader_support/src/esp_image_format.o
CC build/bootloader/bootloader_support/src/flash_partitions.o
CC build/bootloader/bootloader_support/src/secure_boot_signatures.o
...
CC build/wpa_supplicant/src/wps/wps_common.o
CC build/wpa_supplicant/src/wps/wps.o
CC build/wpa_supplicant/src/wps/wps_dev_attr.o
CC build/wpa_supplicant/src/wps/wps_attr_parse.o
CC build/wpa_supplicant/src/wps/wps_validate.o
CC build/wpa_supplicant/src/wps/wps_attr_process.o
CC build/wpa_supplicant/src/wps/eap_common.o
AR build/wpa_supplicant/libwpa_supplicant.a
CC build/xtensa-debug-module/trax.o
CC build/xtensa-debug-module/eri.o
AR build/xtensa-debug-module/libxtensa-debug-module.a
LD build/atomvvm-esp32.elf
esptool.py v2.6-beta1
To flash all build output, run 'make flash' or:
python /work/opt/esp-idf-v3.1.1/components/esptool_py/esptool/esptool.py --chip esp32 --port /dev/ttyUSB0 --baud 115200 --before default_reset --after hard_reset write_flash -z --flash_mode dio --flash_freq 40m --flash_size detect 0x1000 /work/src/github/fadushin/AtomVM/src/platforms/esp32/build/bootloader/bootloader.bin 0x10000 /work/src/github/fadushin/AtomVM/src/platforms/esp32/build/atomvvm-esp32.bin 0x8000 /work/src/github/fadushin/AtomVM/src/platforms/esp32/build/partitions.bin
Congratulations! You have now build the AtomVM virtual machine for the ESP32.
Flashing the ESP32
The last few lines of the above gmake run suggest how to flash AtomVM to your ESP32. However, this is just a suggestion, and we need to make a slight modification to your build configuration to flash to the proper serial device.
Fortunately, the build system makes this pretty easy. If you run the menuconfig target to Make, it will bring up a curses-style interface, which you can use to configure the flasher:
shell$ gmake menuconfig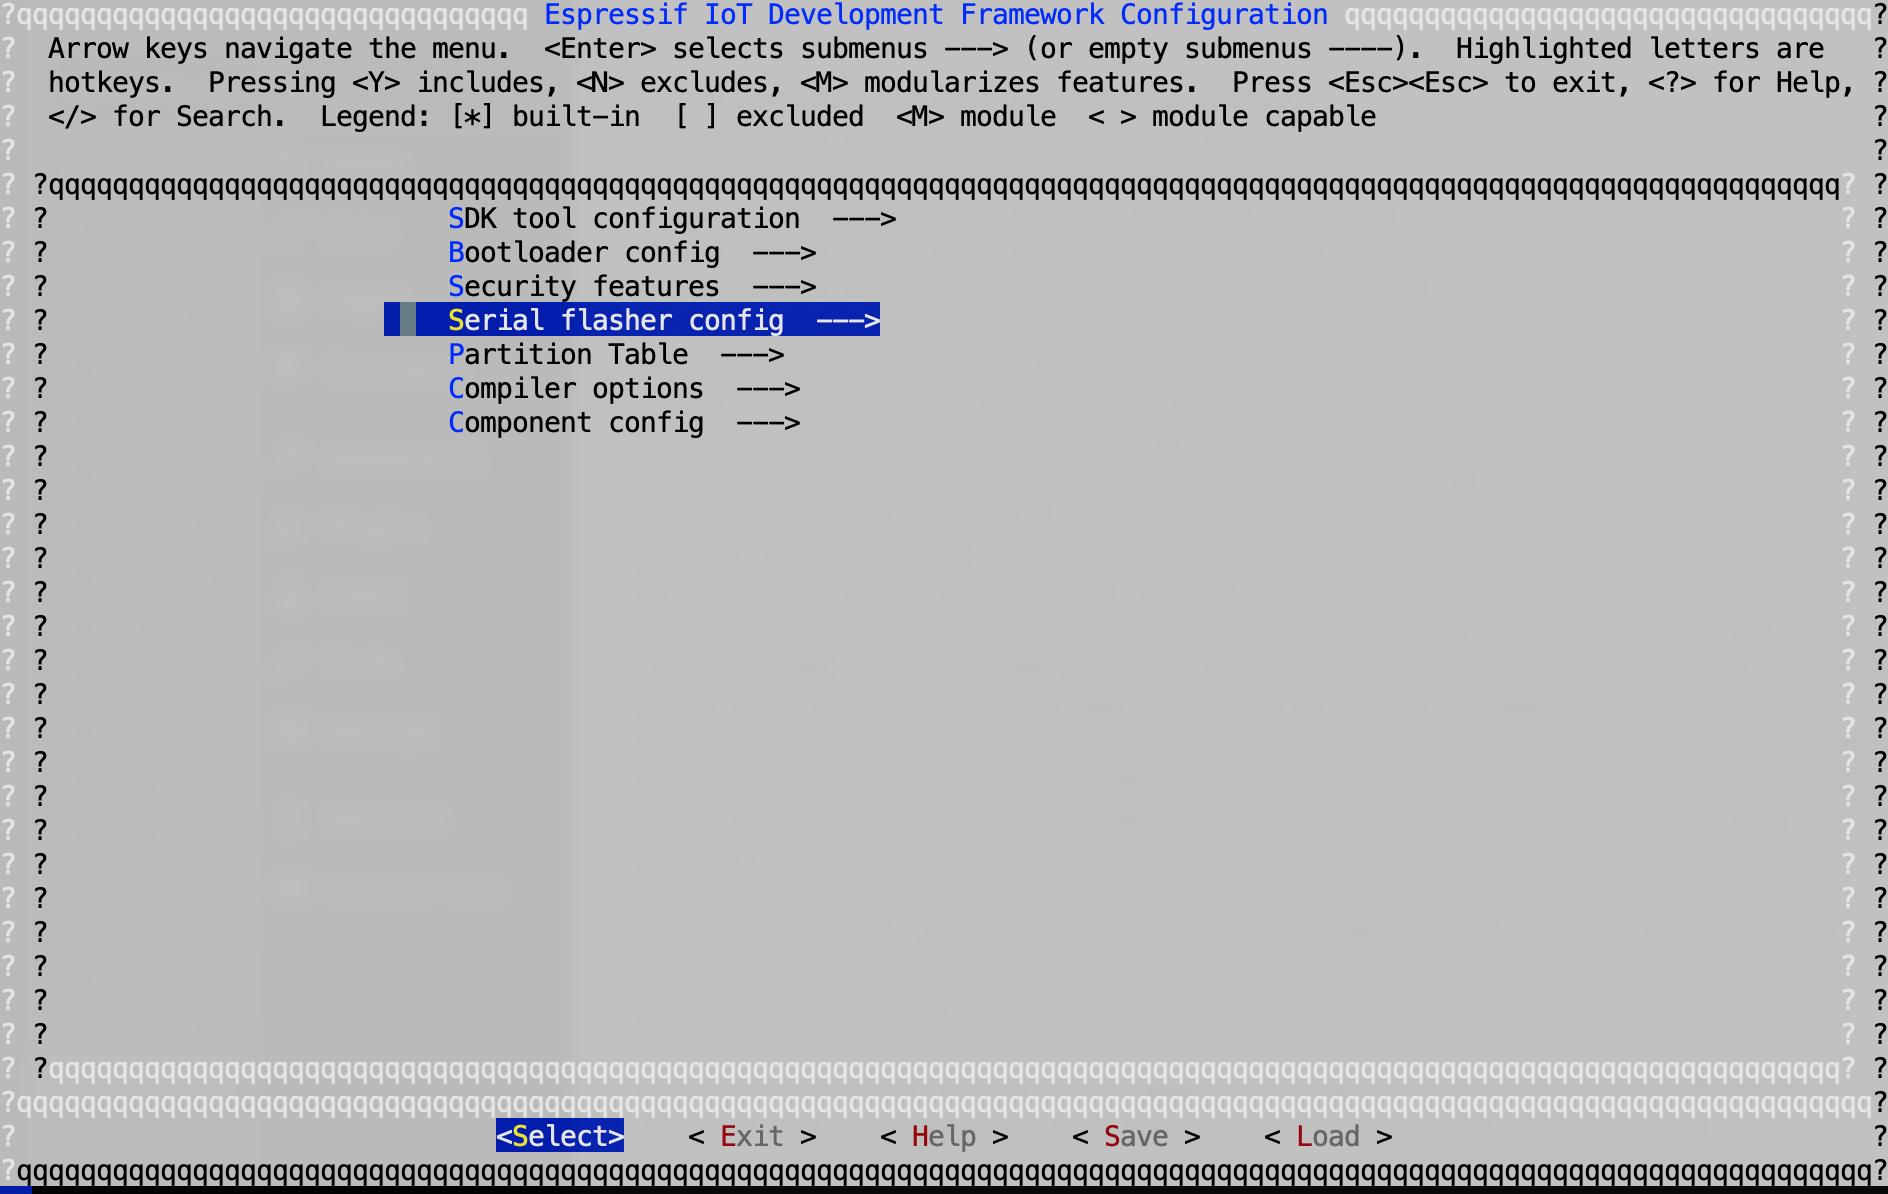
Select the Serial flasher config menu item, and you can configure the serial port:
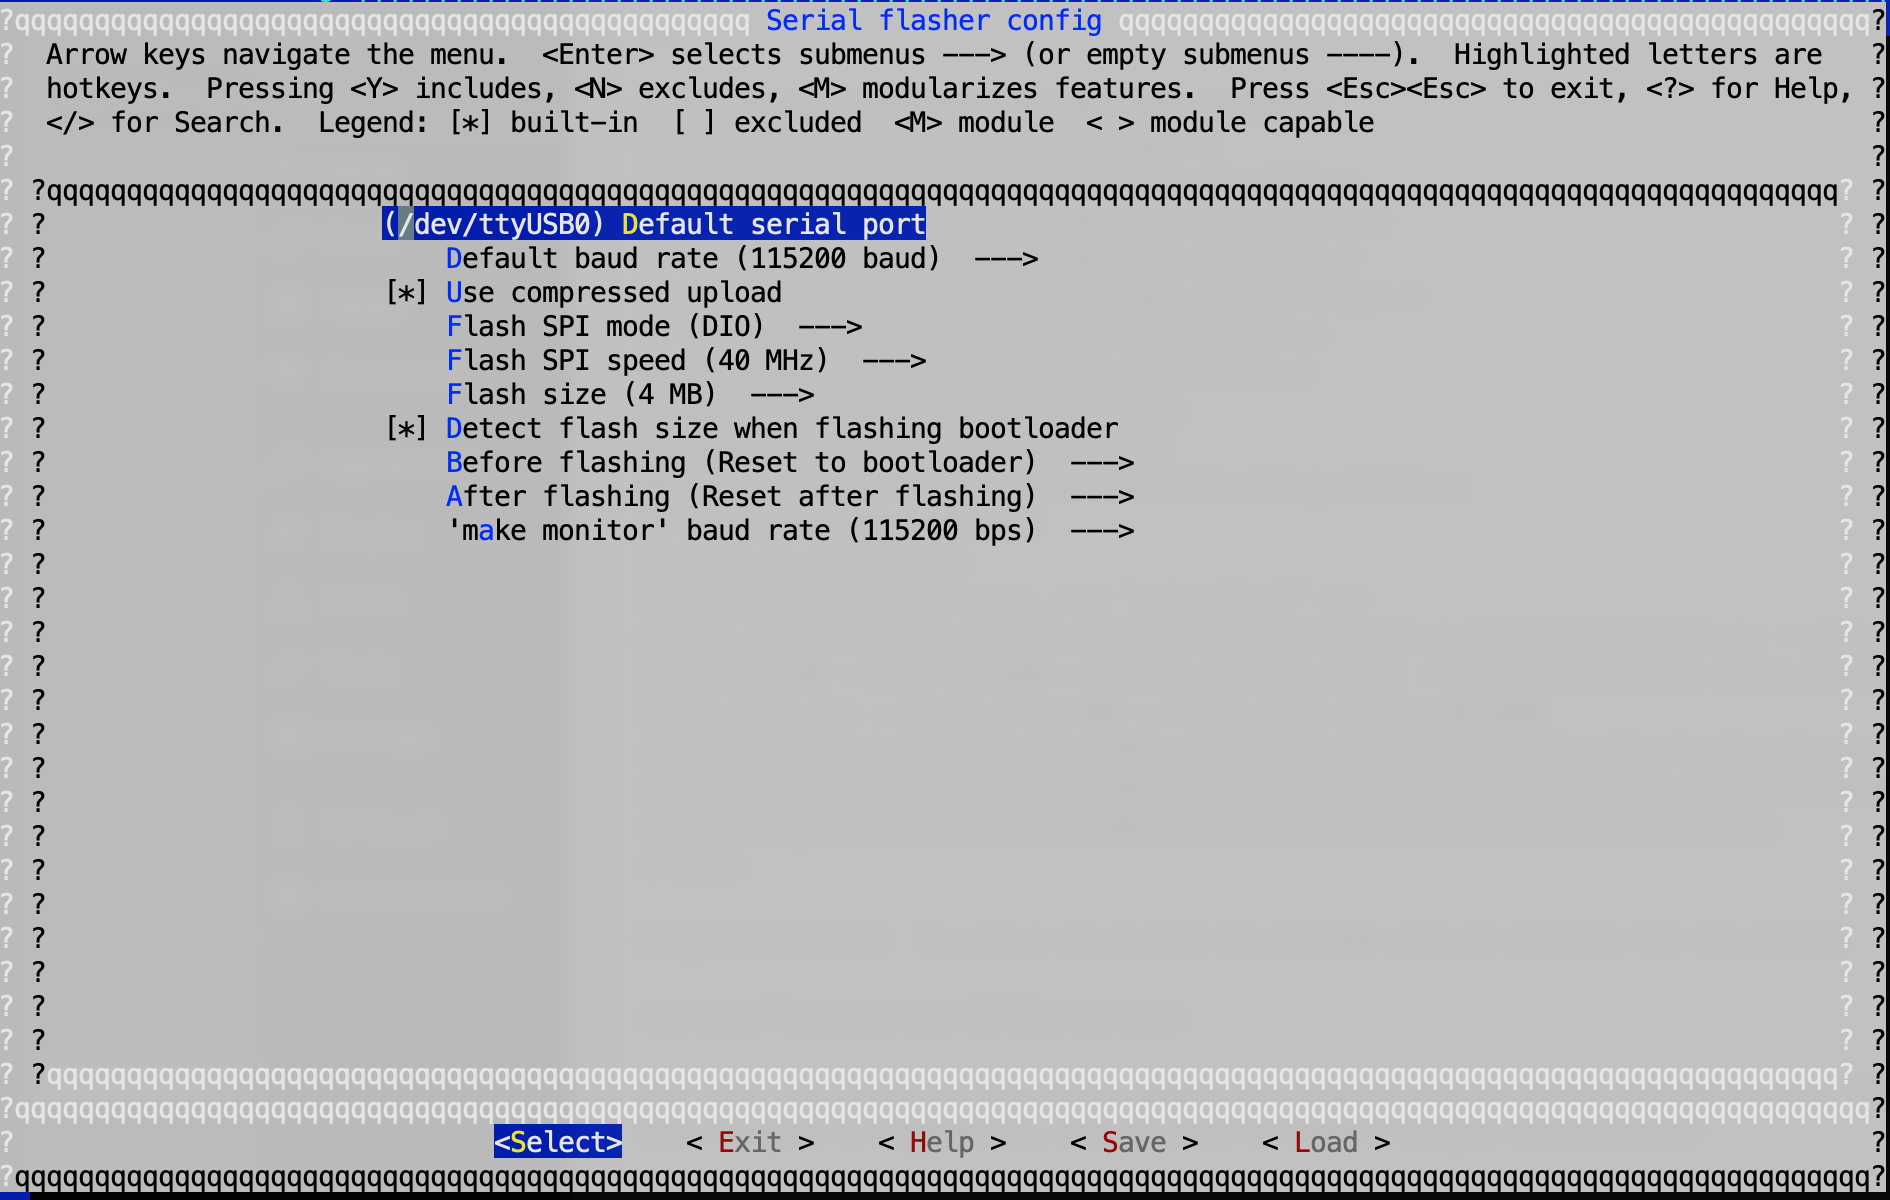
My Mac attaches to /dev/tty.SLAB_USBtoUART:
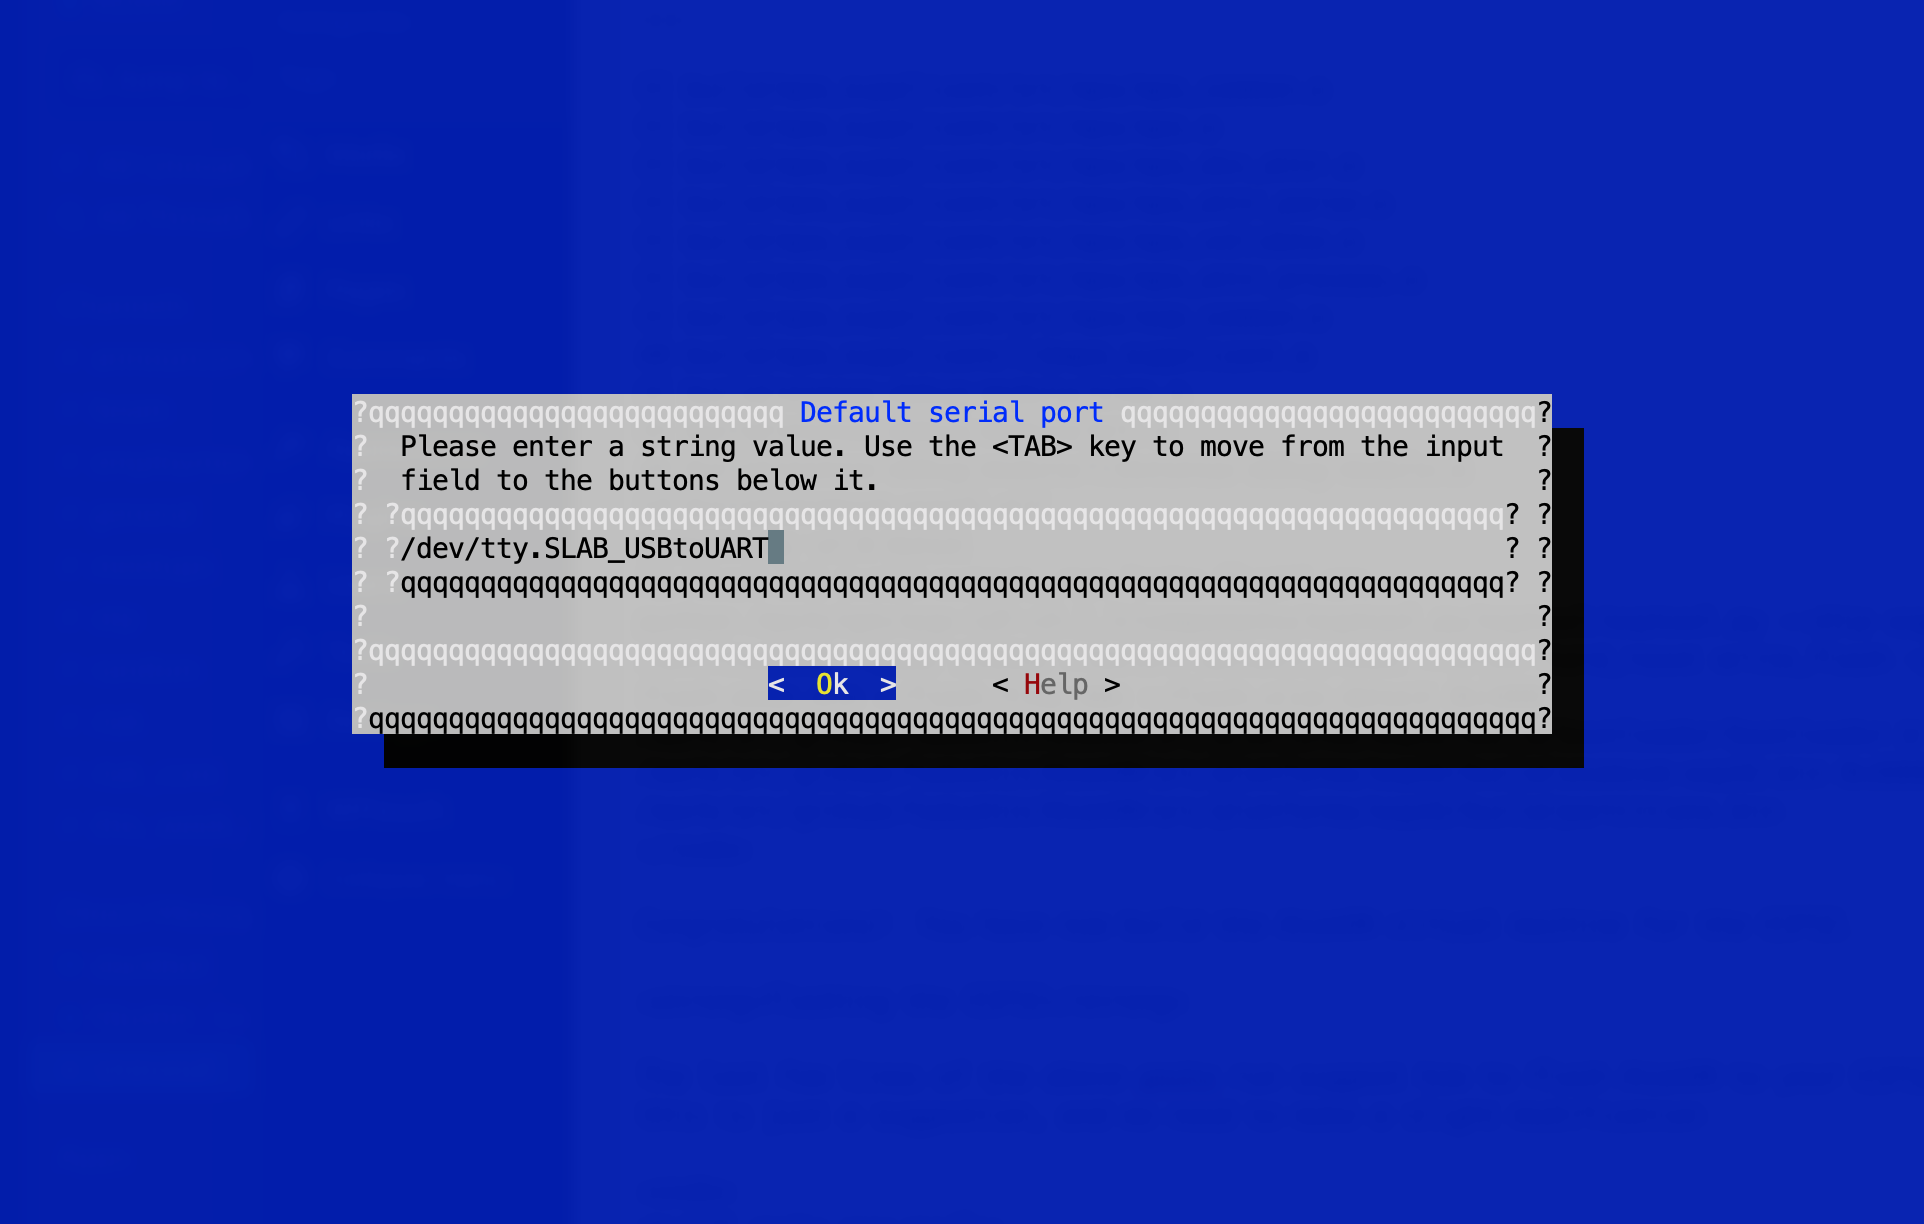
Accept the changes, and exit the menu configuration interface.
You should then be able to run the flash target to Make:
shell$ gmake flash
...
esptool.py v2.6-beta1
Flashing binaries to serial port /dev/tty.SLAB_USBtoUART (app at offset 0x10000 )...
esptool.py v2.6-beta1
Serial port /dev/tty.SLAB_USBtoUART
Connecting........_____....._____.....__
Chip is ESP32D0WDQ6 (revision 1)
Features: WiFi, BT, Dual Core, 240MHz, VRef calibration in efuse, Coding Scheme None
MAC: 3c:71:bf:84:d9:08
Uploading stub...
Running stub...
Stub running...
Configuring flash size...
Auto-detected Flash size: 4MB
Compressed 20944 bytes to 12406...
Wrote 20944 bytes (12406 compressed) at 0x00001000 in 1.1 seconds (effective 153.2 kbit/s)...
Hash of data verified.
Compressed 653088 bytes to 388105...
Wrote 653088 bytes (388105 compressed) at 0x00010000 in 34.2 seconds (effective 152.6 kbit/s)...
Hash of data verified.
Compressed 3072 bytes to 117...
Wrote 3072 bytes (117 compressed) at 0x00008000 in 0.0 seconds (effective 1623.9 kbit/s)...
Hash of data verified.
Leaving...
Hard resetting via RTS pin...
Congratulations! You should now have the base AtomVM image uploaded to your ESP32.
Flashing Blinky
Okay, now for the moment of truth. We want to install an actual Erlang program onto the device, and for that, what better program than the “Hello World” of the IoT universe, blinky. This little program (blink.erl), which you can find under atom-vm-src-dir/ examples/erlang/esp32.
I’ll talk more about this program in a subsequent blog post, but for now, you can simply move on to flashing and running it, as it is built for you as part of the AtomVM build.
You can flash the packed AVM file to your ESP32, starting at an offset of 0x110000 using the ESPtool, which is installed with your ESP-IDF framework:
shell$ $IDF_PATH/components/esptool_py/esptool/esptool.py --chip esp32 --port /dev/tty.SLAB_USBtoUART --baud 115200 --before default_reset --after hard_reset write_flash -u --flash_mode dio --flash_freq 40m --flash_size detect  0x110000 examples/erlang/esp32/blink.avm
esptool.py v2.6-beta1
Serial port /dev/tty.SLAB_USBtoUART
Connecting........_____....._____....._____...
Chip is ESP32D0WDQ6 (revision 1)
Features: WiFi, BT, Dual Core, 240MHz, VRef calibration in efuse, Coding Scheme None
MAC: 3c:71:bf:84:d9:08
Uploading stub...
Running stub...
Stub running...
Configuring flash size...
Auto-detected Flash size: 4MB
Wrote 16384 bytes at 0x00110000 in 1.4 seconds (91.3 kbit/s)...
Hash of data verified.
Leaving...
Hard resetting via RTS pin...
At this point, you should see the on-board LED on pin 2 (usually blue) on your ESP32 device go on for a second, and then off for a second, in a loop. If it is, congratulations! You have run your first Erlang program on an ESP32 device!
Monitoring your ESP32
You can monitor any console output on your ESP32 via the monitor target to make (from the atom-vm-src-dir/src/platforms/esp32 directory):
shell$ cd atom-vm-src-dir/src/platforms/esp32
shell$ gmake monitor
MONITOR
--- WARNING: Serial ports accessed as /dev/tty.* will hang gdb if launched.
--- Using /dev/cu.SLAB_USBtoUART instead...
--- idf_monitor on /dev/cu.SLAB_USBtoUART 115200 ---
--- Quit: Ctrl+] | Menu: Ctrl+T | Help: Ctrl+T followed by Ctrl+H ---
ets Jun  8 2016 00:22:57
rst:0x1 (POWERON_RESET),boot:0x13 (SPI_FAST_FLASH_BOOT)
configsip: 0, SPIWP:0xee
clk_drv:0x00,q_drv:0x00,d_drv:0x00,cs0_drv:0x00,hd_drv:0x00,wp_drv:0x00
mode:DIO, clock div:2
load:0x3fff0018,len:4
load:0x3fff001c,len:5740
load:0x40078000,len:9032
load:0x40080000,len:6064
0x40080000: _iram_start at /work/opt/esp-idf-v3.1.1/components/freertos/xtensa_vectors.S:1685
entry 0x40080330
0x40080330: _KernelExceptionVector at ??:?
I (29) boot: ESP-IDF v3.1.1-rc2-2-gd1d2ce8c2-dirty 2nd stage bootloader
I (29) boot: compile time 15:32:59
I (38) boot: Enabling RNG early entropy source...
I (38) boot: SPI Speed : 40MHz
I (39) boot: SPI Mode : DIO
I (43) boot: SPI Flash Size : 4MB
I (47) boot: Partition Table:
I (51) boot: ## Label Usage Type ST Offset Length
I (58) boot: 0 nvs WiFi data 01 02 00009000 00006000
I (66) boot: 1 phy_init RF data 01 01 0000f000 00001000
I (73) boot: 2 factory factory app 00 00 00010000 00100000
I (81) boot: 3 main.avm RF data 01 01 00110000 00100000
I (88) boot: End of partition table
I (92) esp_image: segment 0: paddr=0x00010020 vaddr=0x3f400020 size=0x148ec ( 84204) map
I (131) esp_image: segment 1: paddr=0x00024914 vaddr=0x3ffb0000 size=0x03938 ( 14648) load
I (137) esp_image: segment 2: paddr=0x00028254 vaddr=0x3ffb3938 size=0x00000 ( 0) load
I (137) esp_image: segment 3: paddr=0x0002825c vaddr=0x40080000 size=0x00400 ( 1024) load
0x40080000: _iram_start at /work/opt/esp-idf-v3.1.1/components/freertos/xtensa_vectors.S:1685
I (147) esp_image: segment 4: paddr=0x00028664 vaddr=0x40080400 size=0x079ac ( 31148) load
I (168) esp_image: segment 5: paddr=0x00030018 vaddr=0x400d0018 size=0x7684c (485452) map
0x400d0018: _stext at ??:?
I (339) esp_image: segment 6: paddr=0x000a686c vaddr=0x40087dac size=0x08e80 ( 36480) load
0x40087dac: rcGetSched at ??:?
I (354) esp_image: segment 7: paddr=0x000af6f4 vaddr=0x400c0000 size=0x00000 ( 0) load
I (354) esp_image: segment 8: paddr=0x000af6fc vaddr=0x50000000 size=0x00000 ( 0) load
I (371) boot: Loaded app from partition at offset 0x10000
I (371) boot: Disabling RNG early entropy source...
I (373) cpu_start: Pro cpu up.
I (376) cpu_start: Starting app cpu, entry point is 0x40080fd8
0x40080fd8: call_start_cpu1 at /work/opt/esp-idf-v3.1.1/components/esp32/cpu_start.c:231
I (0) cpu_start: App cpu up.
I (387) heap_init: Initializing. RAM available for dynamic allocation:
I (393) heap_init: At 3FFAE6E0 len 00001920 (6 KiB): DRAM
I (399) heap_init: At 3FFB9938 len 000266C8 (153 KiB): DRAM
I (406) heap_init: At 3FFE0440 len 00003BC0 (14 KiB): D/IRAM
I (412) heap_init: At 3FFE4350 len 0001BCB0 (111 KiB): D/IRAM
I (418) heap_init: At 40090C2C len 0000F3D4 (60 KiB): IRAM
I (425) cpu_start: Pro cpu start user code
I (107) cpu_start: Starting scheduler on PRO CPU.
I (0) cpu_start: Starting scheduler on APP CPU.
Found AVM partition: size: 1048576, address: 0x110000
Booting file mapped at: 0x3f420000, size: 1048576
Starting: blink.beam...
---
Any output should occur after the ---. You can exit monitoring by pressing ctl-].
That’s it for now! Next time, we’ll dig in a little deeper into Erlang programs under AtomVM.
Bonus
If you want to run AtomVM in a powerful debugger, you can do so very easily with cmake. Just specify the Xcode generator when running CMake, and instead of Make files, you’ll get an Xcode project, which you can open and run.
shell$ cd path-to-atomvm-repo
shell$ mkdir xcode
shell$ cd xcode
shell$ cmake -G Xcode ..
-- The C compiler identification is AppleClang 10.0.0.10001145
-- The CXX compiler identification is AppleClang 10.0.0.10001145
-- Check for working C compiler: /Applications/Xcode.app/Contents/Developer/Toolchains/XcodeDefault.xctoolchain/usr/bin/clang
-- Check for working C compiler: /Applications/Xcode.app/Contents/Developer/Toolchains/XcodeDefault.xctoolchain/usr/bin/clang -- works
-- Detecting C compiler ABI info
-- Detecting C compiler ABI info - done
-- Detecting C compile features
-- Detecting C compile features - done
-- Check for working CXX compiler: /Applications/Xcode.app/Contents/Developer/Toolchains/XcodeDefault.xctoolchain/usr/bin/clang++
-- Check for working CXX compiler: /Applications/Xcode.app/Contents/Developer/Toolchains/XcodeDefault.xctoolchain/usr/bin/clang++ -- works
-- Detecting CXX compiler ABI info
-- Detecting CXX compiler ABI info - done
-- Detecting CXX compile features
-- Detecting CXX compile features - done
-- Found ZLIB: /usr/lib/libz.dylib (found version "1.2.11")
-- Configuring done
-- Generating done
-- Build files have been written to: /work/src/github/fadushin/AtomVM/xcode
You can then open the project file (AtomVM.xcodeproj) on the command line, or via double click in the Finder.
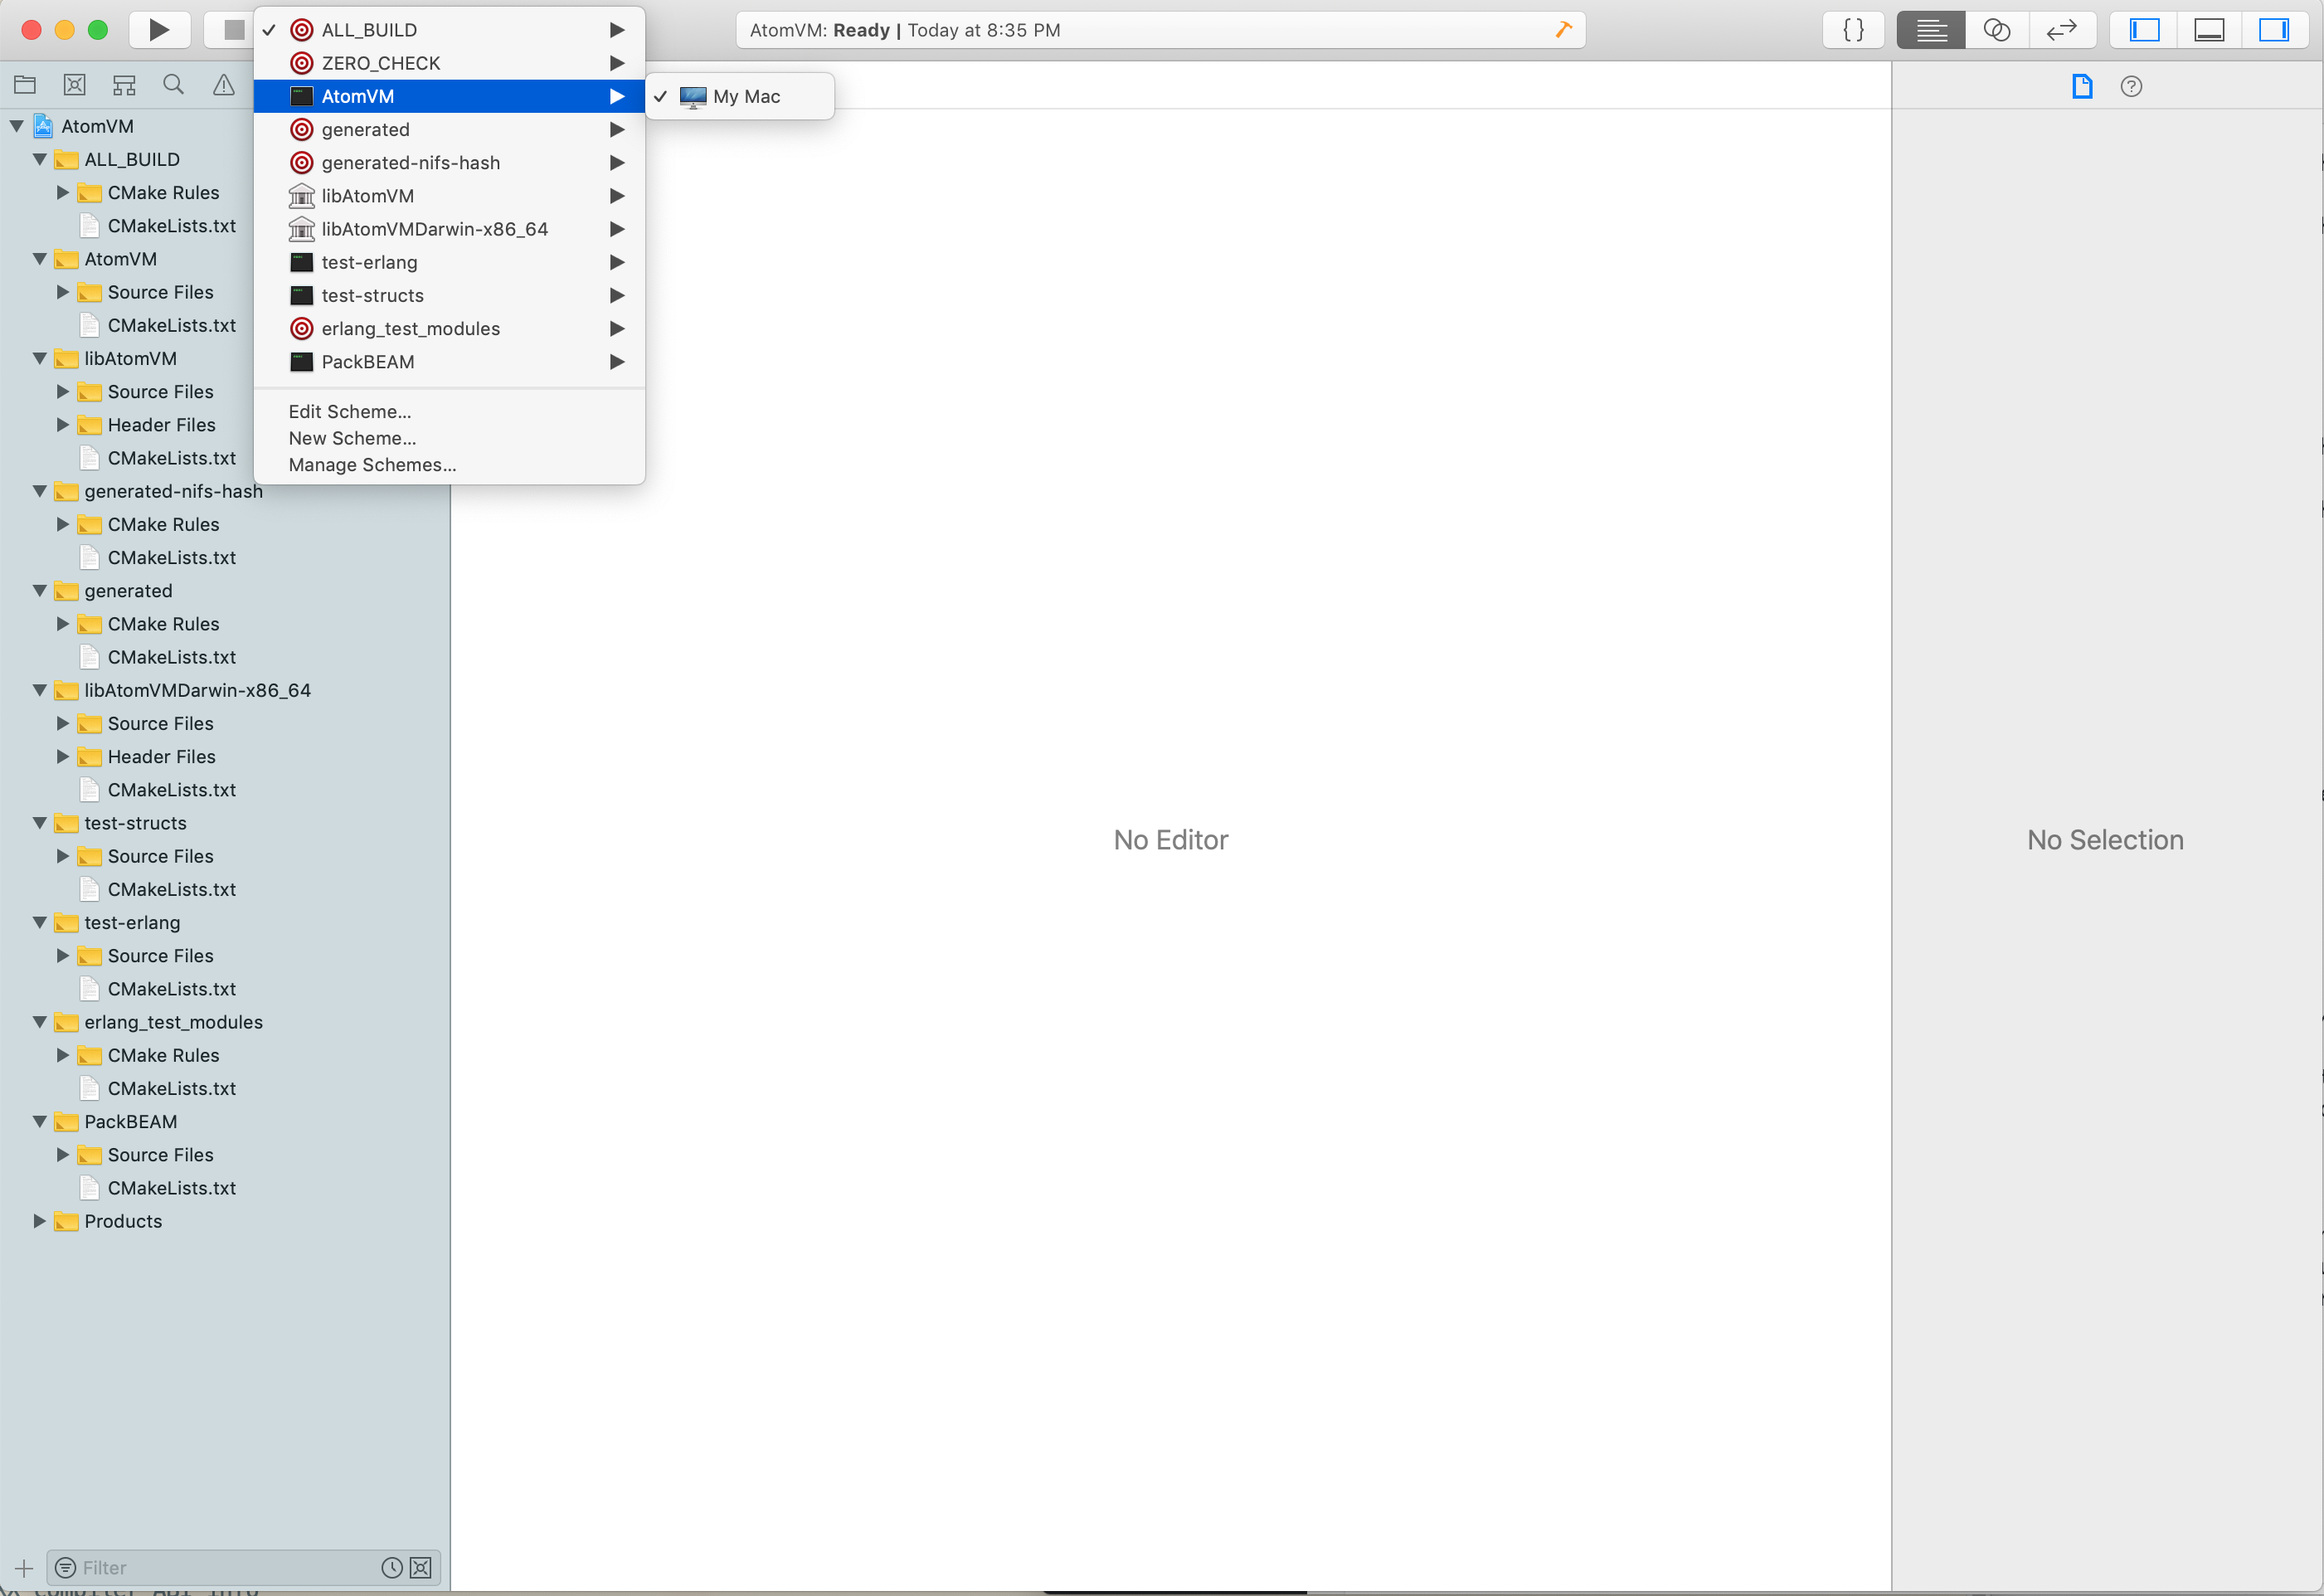
To run AtomVM in the debugger, choose the AtomVM scheme in the target drop down menu:
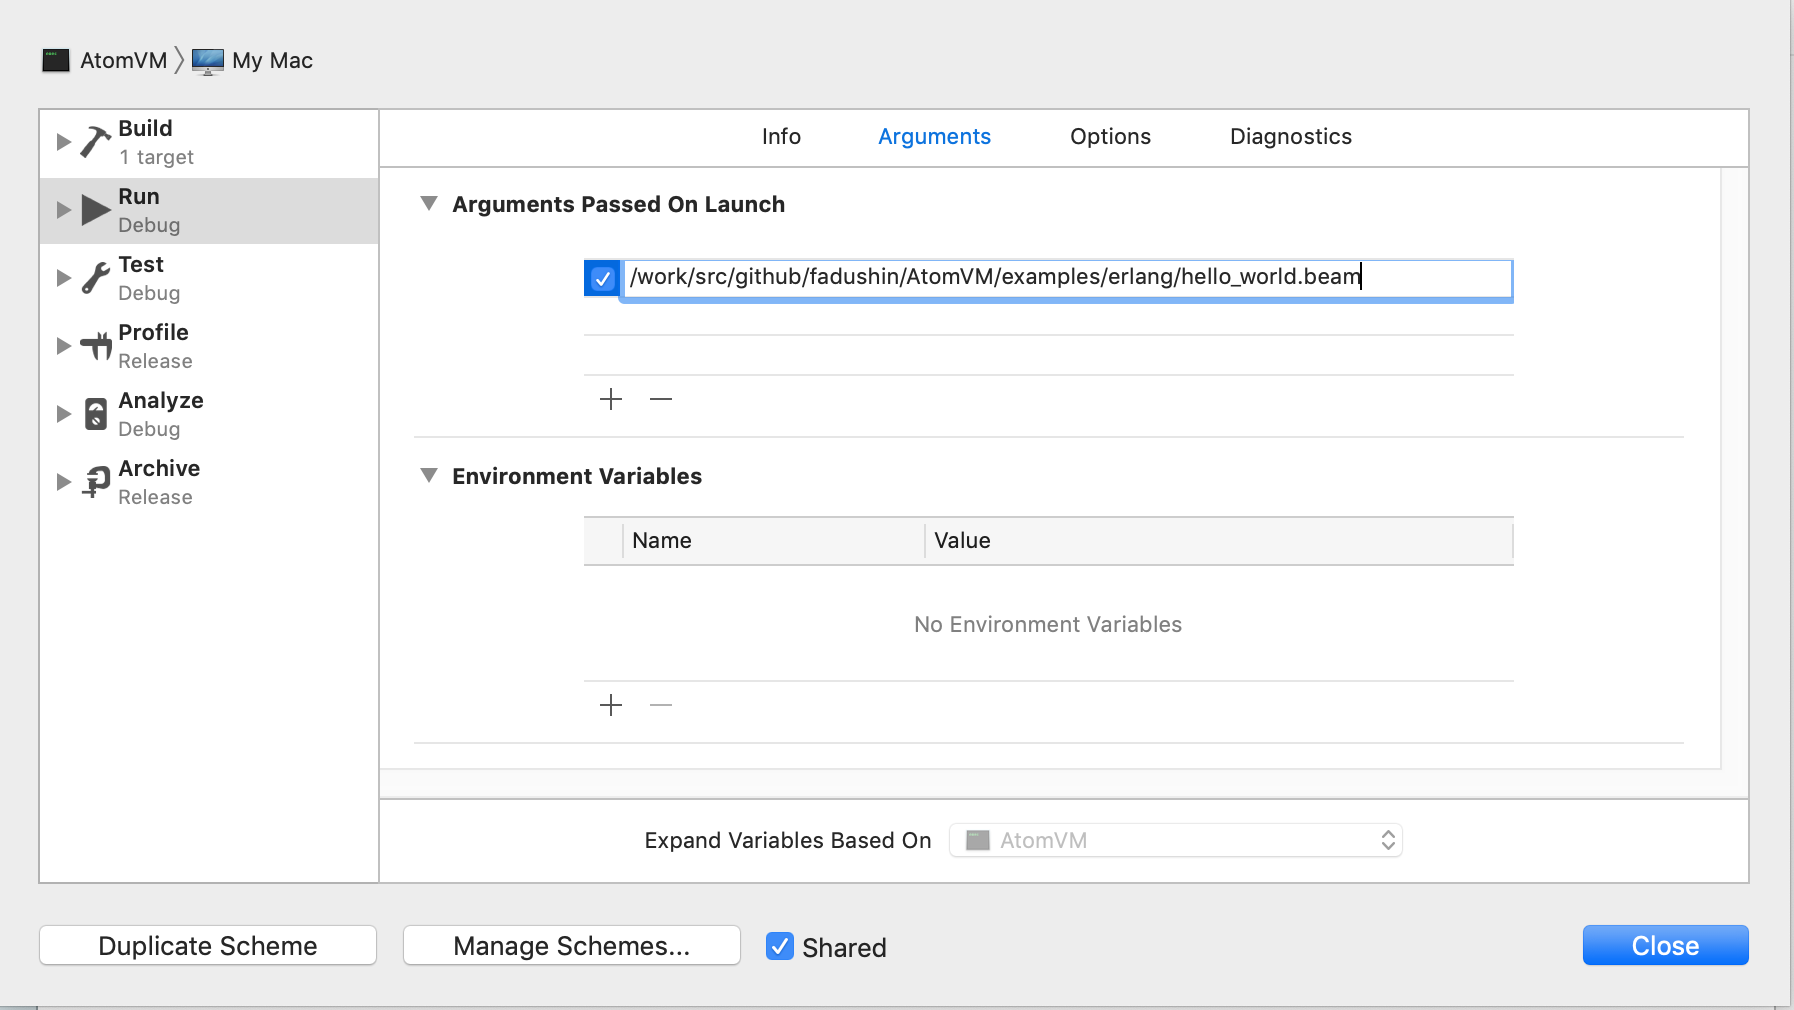
Select “Edit Scheme” in the same target drop down menu, and enter the path to the hello_world.beam file that you built above.
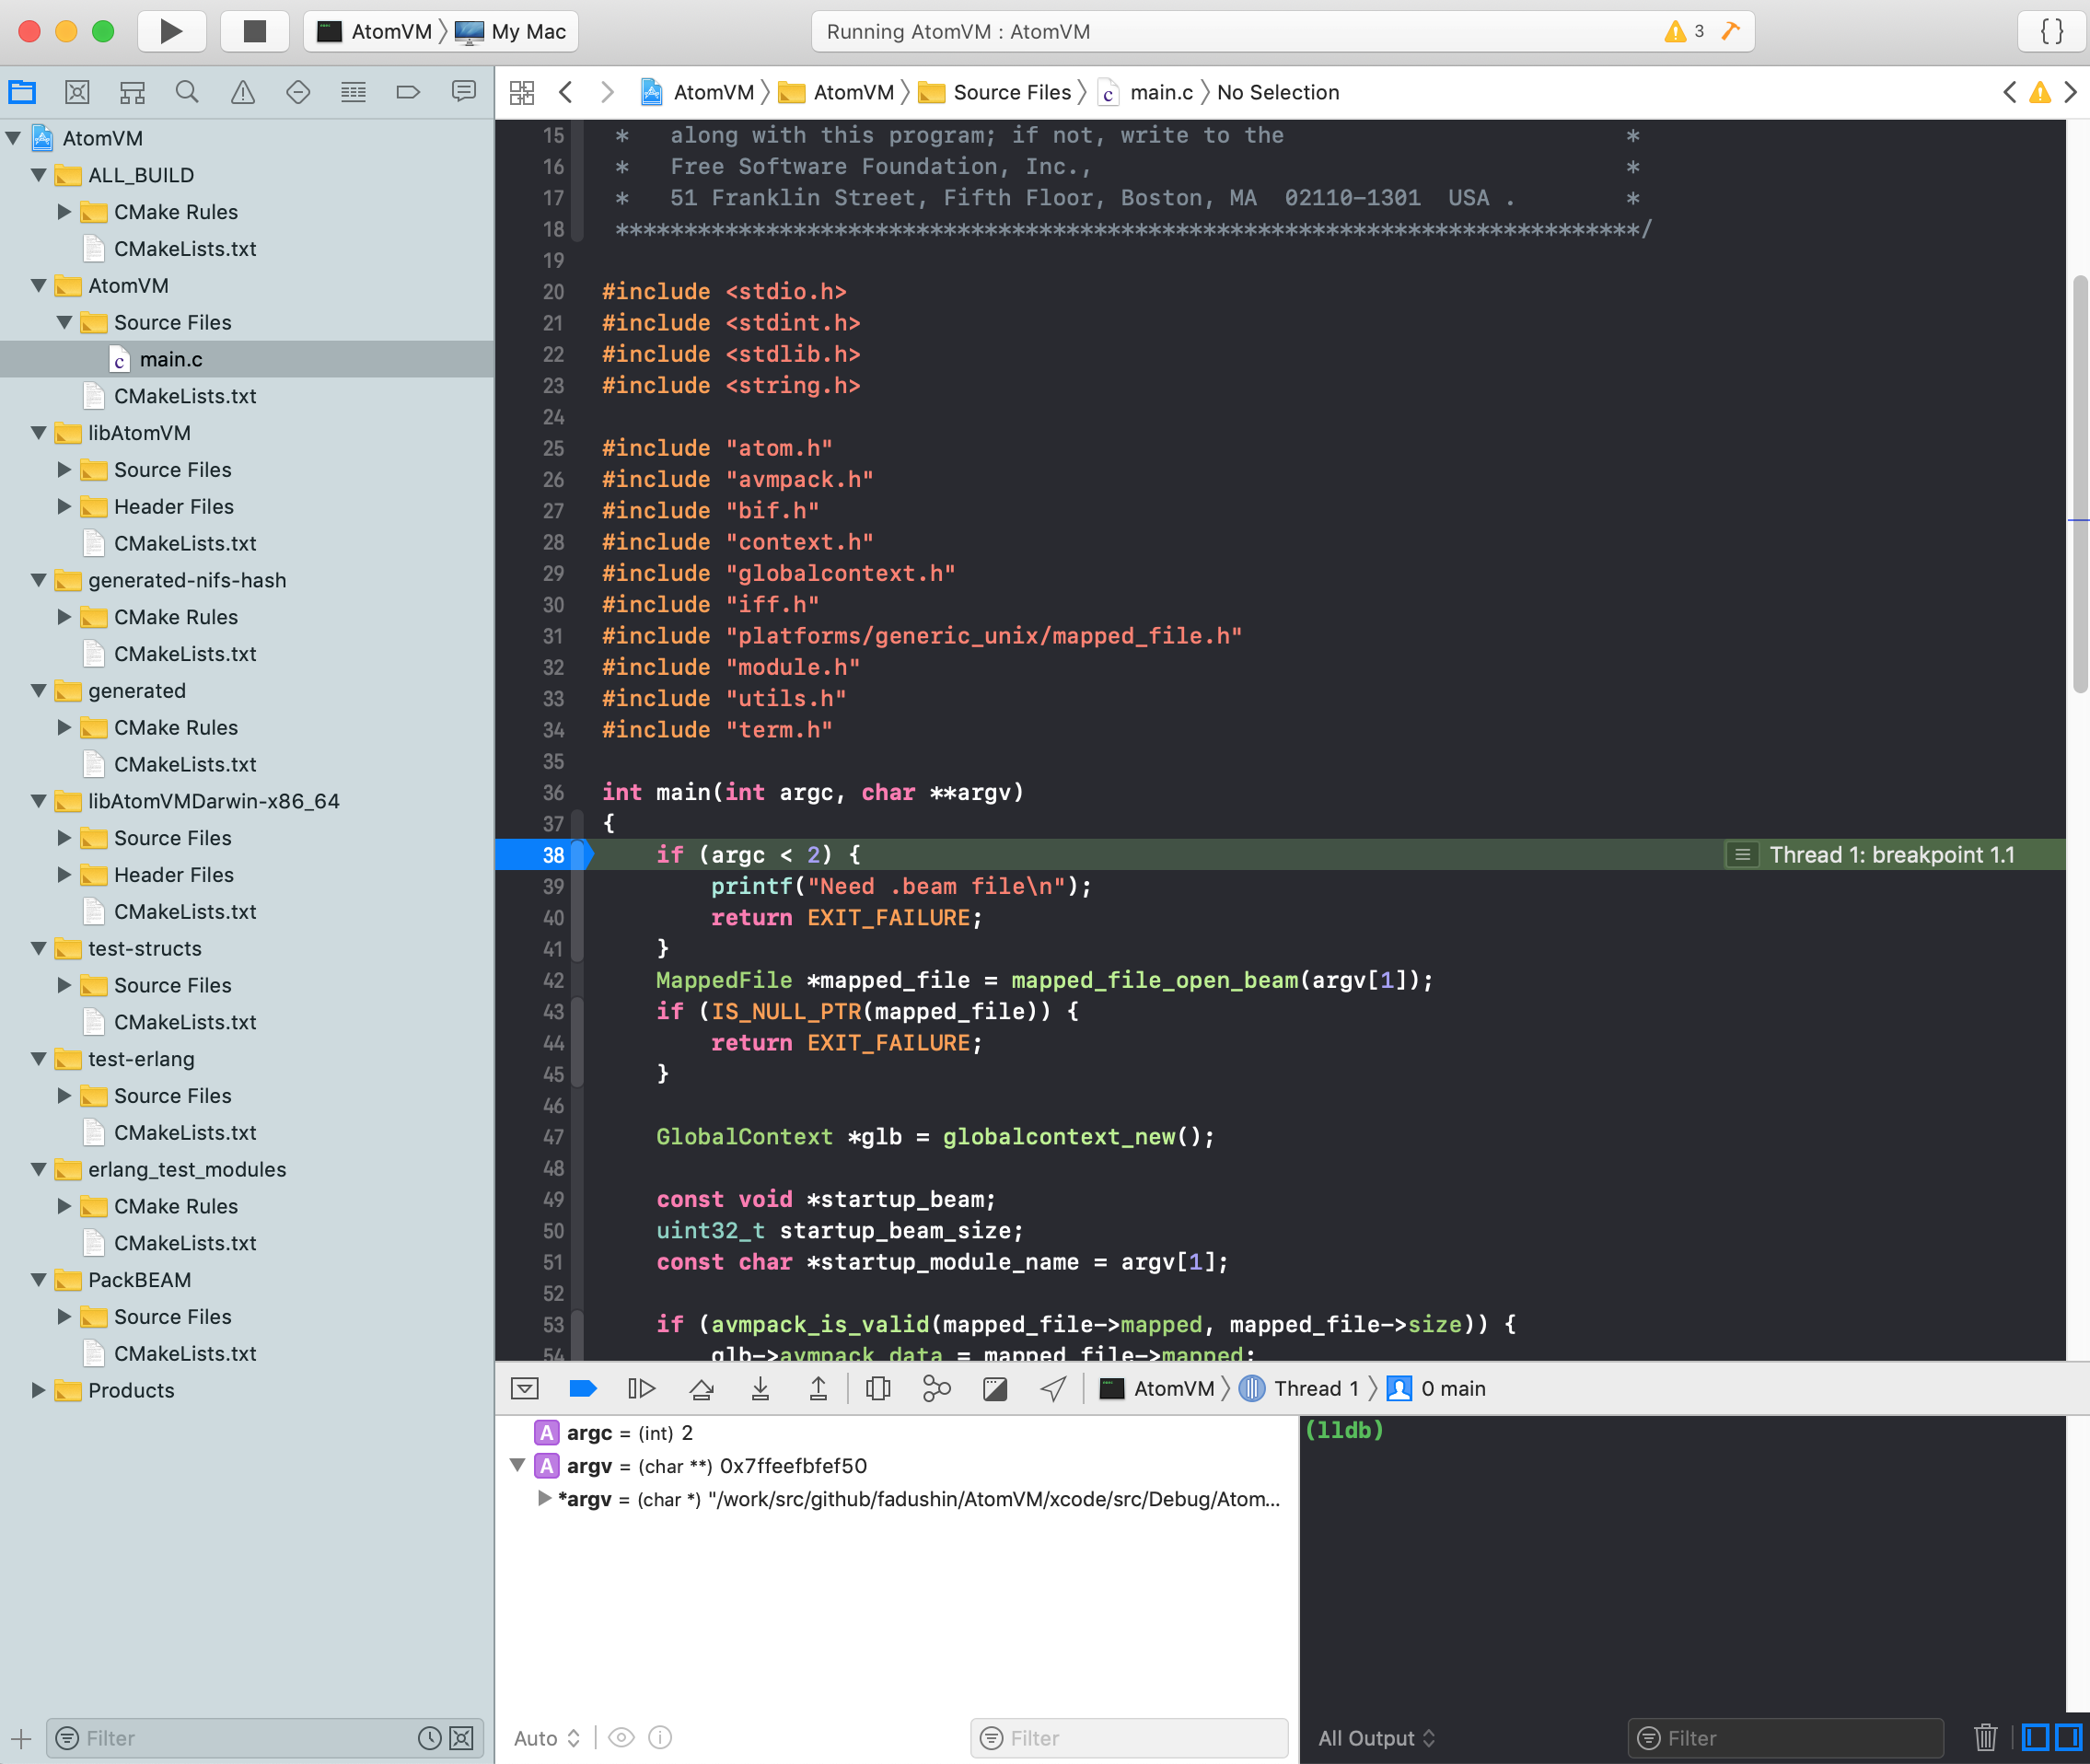
Open the main.c source code module in the AtomVM project. Put a breakpoint at the start of the program, and hit the run button. You can now step through the AtomVM runtime.
Copyright (c) 2018 dushin.net This work is licensed under a Creative Commons Attribution 4.0 International License.

Comments
Because of the prevalence of automated spam on the internet, I turn off comments on my blog posts. If you have comments or questions about this, please send me email using first-name -at- last-name -dot- net, where you can find my first and last name in the About page of this blog.